

A better way to handle user authentication in Rails
Forget Devise. There's a better way to add user authentication logic with the Authentication Zero gem.


Table of contents
- A background on has_secure_password
- Introducing Authentication Zero
- Our demonstration app
- Setting up the gem
- Let's take a look at our routes
- Create controllers and views
- Booting up our demo app
- A closer look at the SessionsController
- OAuth Authentication
- How Two Factor Authentication (2FA) is handled
- Sudo Actions
- Why I like this approach
For a long time, Devise has been the go-to authentication solution for many Rails applications. Although Devise has long served as the option for authentication, it is not the gem I would recommend in 2022 for new Rails projects.
Since Rails 3, the framework has shipped its own authentication helper, has_secure_password. This is how Hey/Basecamp, for example, handles authentication. In this tutorial, I want to introduce you to the gem Authentication Zero, which leverages this part of the framework and provides a robust authentication codebase that is much easier to work with than the existing options.
A background on has_secure_password
If you’re not familiar with this, Rails ships a partial authentication functionality out of the box under the Activemodel::SecurePassword class.
Here’s the bit of code from the Rails API documentation:
# Schema: User(name:string, password_digest:string, recovery_password_digest:string)
class User < ActiveRecord::Base
  has_secure_password
  has_secure_password :recovery_password, validations: false
end
With the above, you’ll be able to do the following:
user = User.new(name: 'user', password: 'rightpassword', password_confirmation: 'wrongpassword')
user.save                                                  # => false, password required
user.password = 'rightpassword'
user.save                                                  # => false, confirmation doesn't match
user.password_confirmation = 'rightpassword'
user.save                                                  # => true
user.authenticate('wrongpassword')                              # => false
user.authenticate('rightpassword')                         # => user
User.find_by(name: 'david')&.authenticate('rightpassword') # => user
Underneath the hood, this authentication mechanism uses BCrypt.
Introducing Authentication Zero
By itself, has_secure_password is not enough to create an authentication system.
You would still need the following:
Controllers to authentication/create and logout sessions
A mechanism to expire sessions
Controllers to handle password resets, updating passwords, etc.
Controllers to handle user registration
And that would just cover the basics. Modern systems would also include:
Two factor authentication
Email verification
Account locking after a number of failed login attempts
Audit logging
Third party login mechanisms
No doubt, generating all this code from scratch takes time. Fortunately, there’s a gem that already does all this: Authentication Zero.
What I like a lot about this gem is that it generates the code that handles these parts of the app, and makes it a part of your codebase.
It does not act as a Rails engine and hides all the code logic internally somewhere. Instead, it is primarily a code generator that creates all the logic for you, and you will be able to customize this code alongside your other models and controllers.
You can check out the code for the gem at github.com/lazaronixon/authentication-zero under the lib directory. The code is clear and understandable and I encourage you to take a look yourself.
Let’s take a tour of the gem by using it to generate authentication logic for a demo app.
Our demonstration app
The code for the demo app can be found at https://github.com/Code-With-Rails/authentication-zero-demo.
We're going to create an app that will handle the following authentication related tasks:
Allow users to login and logout
Check for vulnerable passwords
Handle two factor authentication
Requires users to enter their password before performing sensitive operations (eg. go to a specific page)
Allows login through GitHub OAuth
Authentication Zero is capable of handling a lot more than the above. You can type bin/rails g authentication --help to get a sense of all the options.
Usage:
  rails generate authentication [options]

Options:
  [--skip-namespace], [--no-skip-namespace]              # Skip namespace (affects only isolated engines)
  [--skip-collision-check], [--no-skip-collision-check]  # Skip collision check
  [--api], [--no-api]                                    # Generates API authentication
  [--pwned], [--no-pwned]                                # Add pwned password validation
  [--code-verifiable], [--no-code-verifiable]            # Add email verification using a code for api
  [--sudoable], [--no-sudoable]                          # Add password request before sensitive data changes
  [--lockable], [--no-lockable]                          # Add password reset locking
  [--omniauthable], [--no-omniauthable]                  # Add social login support
  [--trackable], [--no-trackable]                        # Add activity log support
  [--two-factor], [--no-two-factor]                      # Add two factor authentication
Setting up the gem
To set up the gem, add:
# Gemfile
gem 'authentication-zero'
Run the usual bundle install and the gem should be installed.
Tip: Because the gem is itself more of a generator, it’s possible to temporarily add this to your Gemfile, use it to generate all the boilerplate code, and then simply remove this dependency altogether.
Update (January 12, 2023): As discussed at https://github.com/lazaronixon/authentication-zero/issues/52, it is recommended that even though the gem could be removed that you do not remove it. Instead, you should keep it as part of your Gemfile (it is a lightweight dependency anyway) and periodically update it. Any security or improvements will then show up as a post-installation message.
Next, run the following command:
bin/rails g authentication --pwned --sudoable --omniauthable --two-factor && bundle install
The option flags we append to the above command is to allow us to:
Check for vulnerable passwords (
--pwned)Ask user for password before performing sensitive operations (
--sudoable)Use GitHub OAuth (
--omniauthable)Enable two factor authentication (
--two-factor)
Finally, running bundle install one more time at the end will ensure that any supporting gems (eg. bcrypt) are also installed.
Authentication Zero will generate a bunch of boilerplate code for you. After this, you can remove the gem's reference from your Gemfile altogether. In our demo code, I've left it in there for reference and commented out the gem.
Let's take a look at our routes
If you open the routes.rb file, you'll see the following:
Rails.application.routes.draw do
  get  'sign_in', to: 'sessions#new'
  post 'sign_in', to: 'sessions#create'
  get  'sign_up', to: 'registrations#new'
  post 'sign_up', to: 'registrations#create'
  resources :sessions, only: [:index, :show, :destroy]
  resource  :password, only: [:edit, :update]
  namespace :sessions do
    resource :sudo, only: [:new, :create]
  end
  namespace :identity do
    resource :email,              only: [:edit, :update]
    resource :email_verification, only: [:edit, :create]
    resource :password_reset,     only: [:new, :edit, :create, :update]
  end
  namespace :two_factor_authentication do
    resource :challenge, only: [:new, :create]
    resource :totp,      only: [:new, :create]
  end
  get  '/auth/failure',            to: 'sessions/omniauth#failure'
  get  '/auth/:provider/callback', to: 'sessions/omniauth#create'
  post '/auth/:provider/callback', to: 'sessions/omniauth#create'
  #...
end
The above routes were added by Authentication Zero during the code generation step above.
Let's view the routes with bin/rails routes:
                                 sign_in GET    /sign_in(.:format)                                                                                sessions#new
                                         POST   /sign_in(.:format)                                                                                sessions#create
                                 sign_up GET    /sign_up(.:format)                                                                                registrations#new
                                         POST   /sign_up(.:format)                                                                                registrations#create
                                sessions GET    /sessions(.:format)                                                                               sessions#index
                                 session GET    /sessions/:id(.:format)                                                                           sessions#show
                                         DELETE /sessions/:id(.:format)                                                                           sessions#destroy
                           edit_password GET    /password/edit(.:format)                                                                          passwords#edit
                                password PATCH  /password(.:format)                                                                               passwords#update
                                         PUT    /password(.:format)                                                                               passwords#update
                       new_sessions_sudo GET    /sessions/sudo/new(.:format)                                                                      sessions/sudos#new
                           sessions_sudo POST   /sessions/sudo(.:format)                                                                          sessions/sudos#create
                     edit_identity_email GET    /identity/email/edit(.:format)                                                                    identity/emails#edit
                          identity_email PATCH  /identity/email(.:format)                                                                         identity/emails#update
                                         PUT    /identity/email(.:format)                                                                         identity/emails#update
        edit_identity_email_verification GET    /identity/email_verification/edit(.:format)                                                       identity/email_verifications#edit
             identity_email_verification POST   /identity/email_verification(.:format)                                                            identity/email_verifications#create
             new_identity_password_reset GET    /identity/password_reset/new(.:format)                                                            identity/password_resets#new
            edit_identity_password_reset GET    /identity/password_reset/edit(.:format)                                                           identity/password_resets#edit
                 identity_password_reset PATCH  /identity/password_reset(.:format)                                                                identity/password_resets#update
                                         PUT    /identity/password_reset(.:format)                                                                identity/password_resets#update
                                         POST   /identity/password_reset(.:format)                                                                identity/password_resets#create
 new_two_factor_authentication_challenge GET    /two_factor_authentication/challenge/new(.:format)                                                two_factor_authentication/challenges#new
     two_factor_authentication_challenge POST   /two_factor_authentication/challenge(.:format)                                                    two_factor_authentication/challenges#create
      new_two_factor_authentication_totp GET    /two_factor_authentication/totp/new(.:format)                                                     two_factor_authentication/totps#new
          two_factor_authentication_totp POST   /two_factor_authentication/totp(.:format)                                                         two_factor_authentication/totps#create
                            auth_failure GET    /auth/failure(.:format)                                                                           sessions/omniauth#failure
                                         GET    /auth/:provider/callback(.:format)                                                                sessions/omniauth#create
                                         POST   /auth/:provider/callback(.:format)                                                                sessions/omniauth#create
(Other routes are truncated with only the relevant authentication routes shown.)
Taking a look at the routes above, here are some routes you now have:
sign_in_pathfor the sign in page (viaGET) and for creating the session (viaPOST)sign_up_pathfor the user registration pageedit_password_pathfor editing your passwords with the correspondingpasswordto persist the changesFor pages where we need the user to enter their password first, we have
new_sessions_sudo_pathandsessions_sudo_path.The app also includes some paths like
edit_identity_email_pathto edit our emailsPaths to password reset (eg.
new_identity_password_reset_path)Two factor authentication paths (eg.
new_two_factor_authentication_challenge_path)And some OAuth paths
Next, let's boot up our app and see what we have. But first, let's generate a home controller and a page we can use.
Create controllers and views
In your console, run the following command:
bin/rails generate controller home index
And then modify app/views/home/index.html.erb:
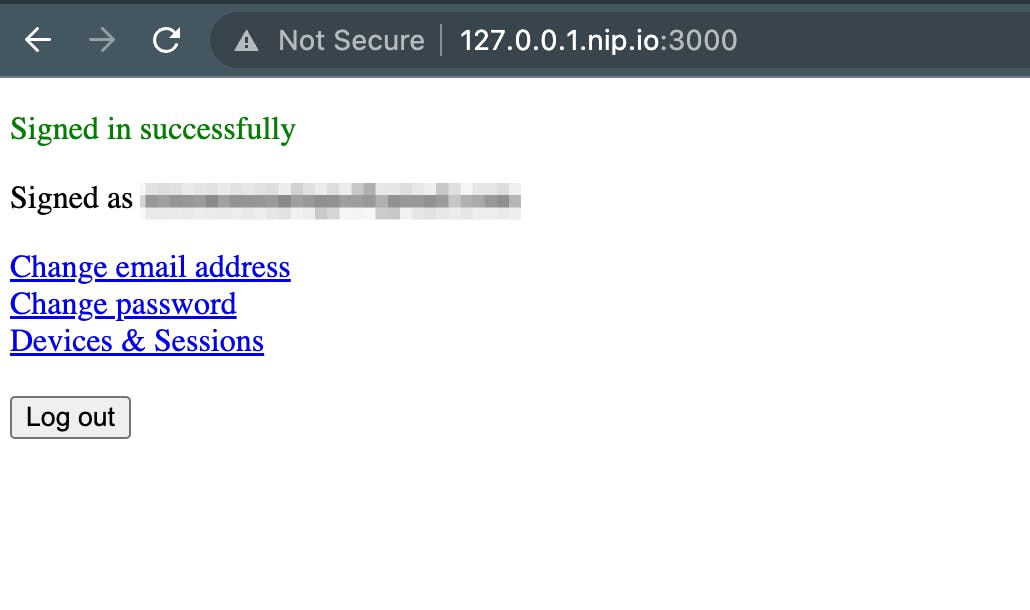
<p style="color: green"><%= notice %></p>

<p>Signed as <%= Current.user.email %></p>

<div><%= link_to "Change email address", edit_identity_email_path %></div>

<div><%= link_to "Change password", edit_password_path %></div>

<div><%= link_to "Devices & Sessions", sessions_path %></div>

<div><%# link_to "Activity Log", authentications_events_path %></div>

<div><%# link_to "Two-Factor Authentication", new_two_factor_authentication_totp_path %></div>

<br>

<%= button_to "Log out", Current.session, method: :delete %>
Finally, let's add this route to our routes.rb:
root 'home#index'
Let's boot up the app and see what we have...
Booting up our demo app
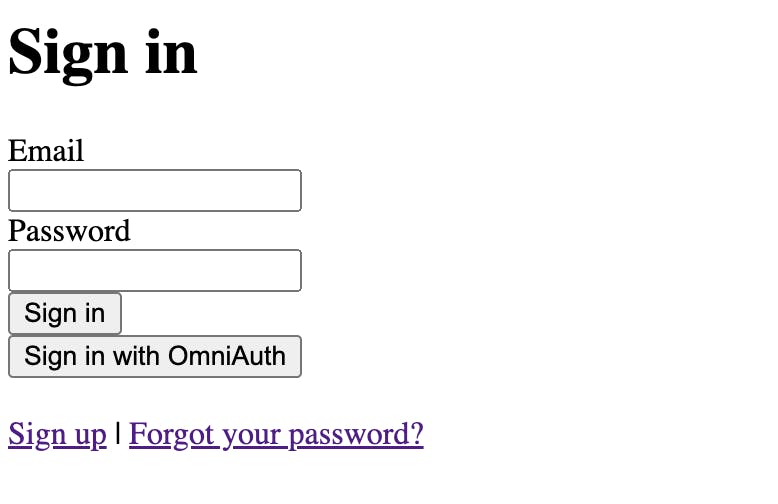
Heading to localhost:3000, we see the following:
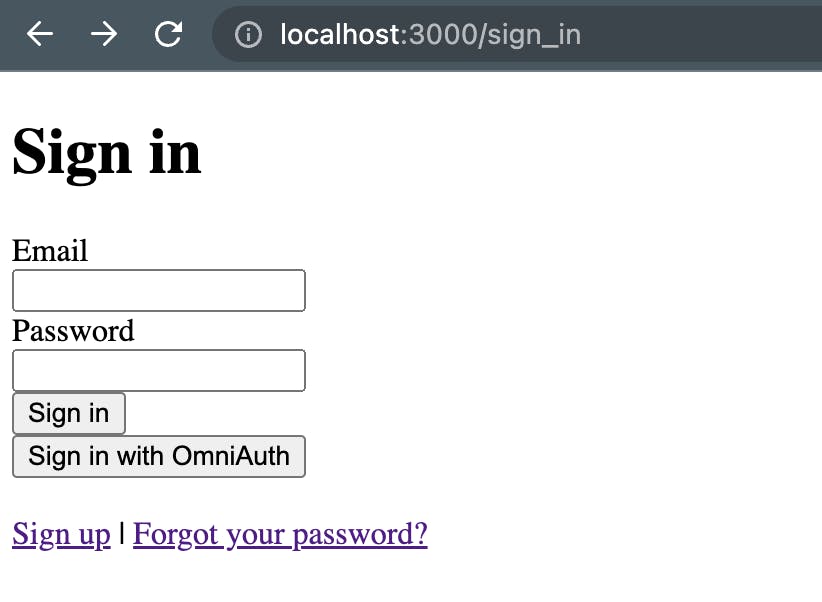
Let's try creating an account. Click on "Sign up".
First, use a very simple password (like password). You will see the following error message:
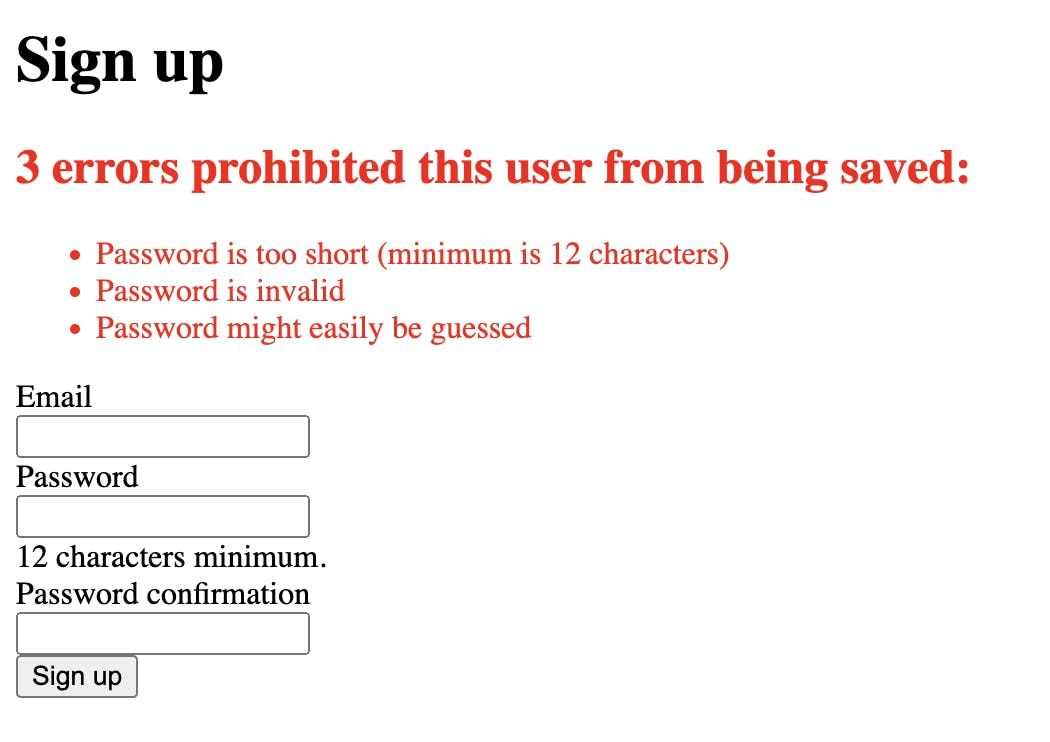
In the User model, we have:
validates :password, not_pwned: { message: "might easily be guessed" }
The not_pwned validation comes from the pwned gem, which Authentication Zero added during the initial code generation.
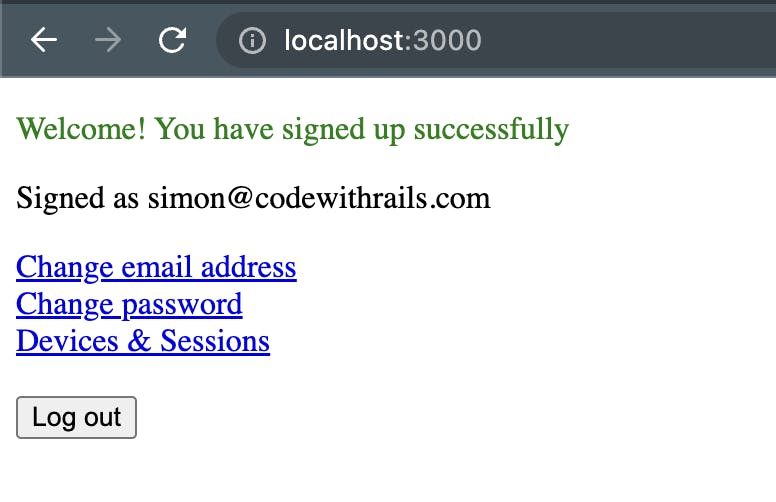
Alright, now enter a really secure password and get your user account created.
Once signed up, you should see this:
A closer look at the SessionsController
The gem has generated a SessionsController. Taking a look, we can see that there's a create and destroy action, each of which corresponds to the sign in and sign out routes.
Here's the create action, for example:
def create
  user = User.find_by(email: params[:email])

  if user && user.authenticate(params[:password])
    if user.otp_secret
      signed_id = user.signed_id(purpose: :authentication_challenge, expires_in: 20.minutes)

      redirect_to new_two_factor_authentication_challenge_path(token: signed_id)
    else
      @session = user.sessions.create!
      cookies.signed.permanent[:session_token] = { value: @session.id, httponly: true }

      redirect_to root_path, notice: "Signed in successfully"
    end
  else
    redirect_to sign_in_path(email_hint: params[:email]), alert: "That email or password is incorrect"
  end
end
You can see that the User instance is first identified by the inputted email, and then we use Rails' has_secure_password method of #authenticate to determine if our password matches the hashed password in our database.
Secondly, we also see that the generated code already hooks into two-factor authentication by checking to see if the user has an otp_secret set.
If it is set, then the user is redirected to the OTP verification page.
OAuth Authentication
Now that we’ve tried out the regular login, let’s set up OAuth authentication.
First, clear your sessions and head back onto to the login page. Once there, click on Sign in with OmniAuth:
This should take you to a test OmniAuth page:
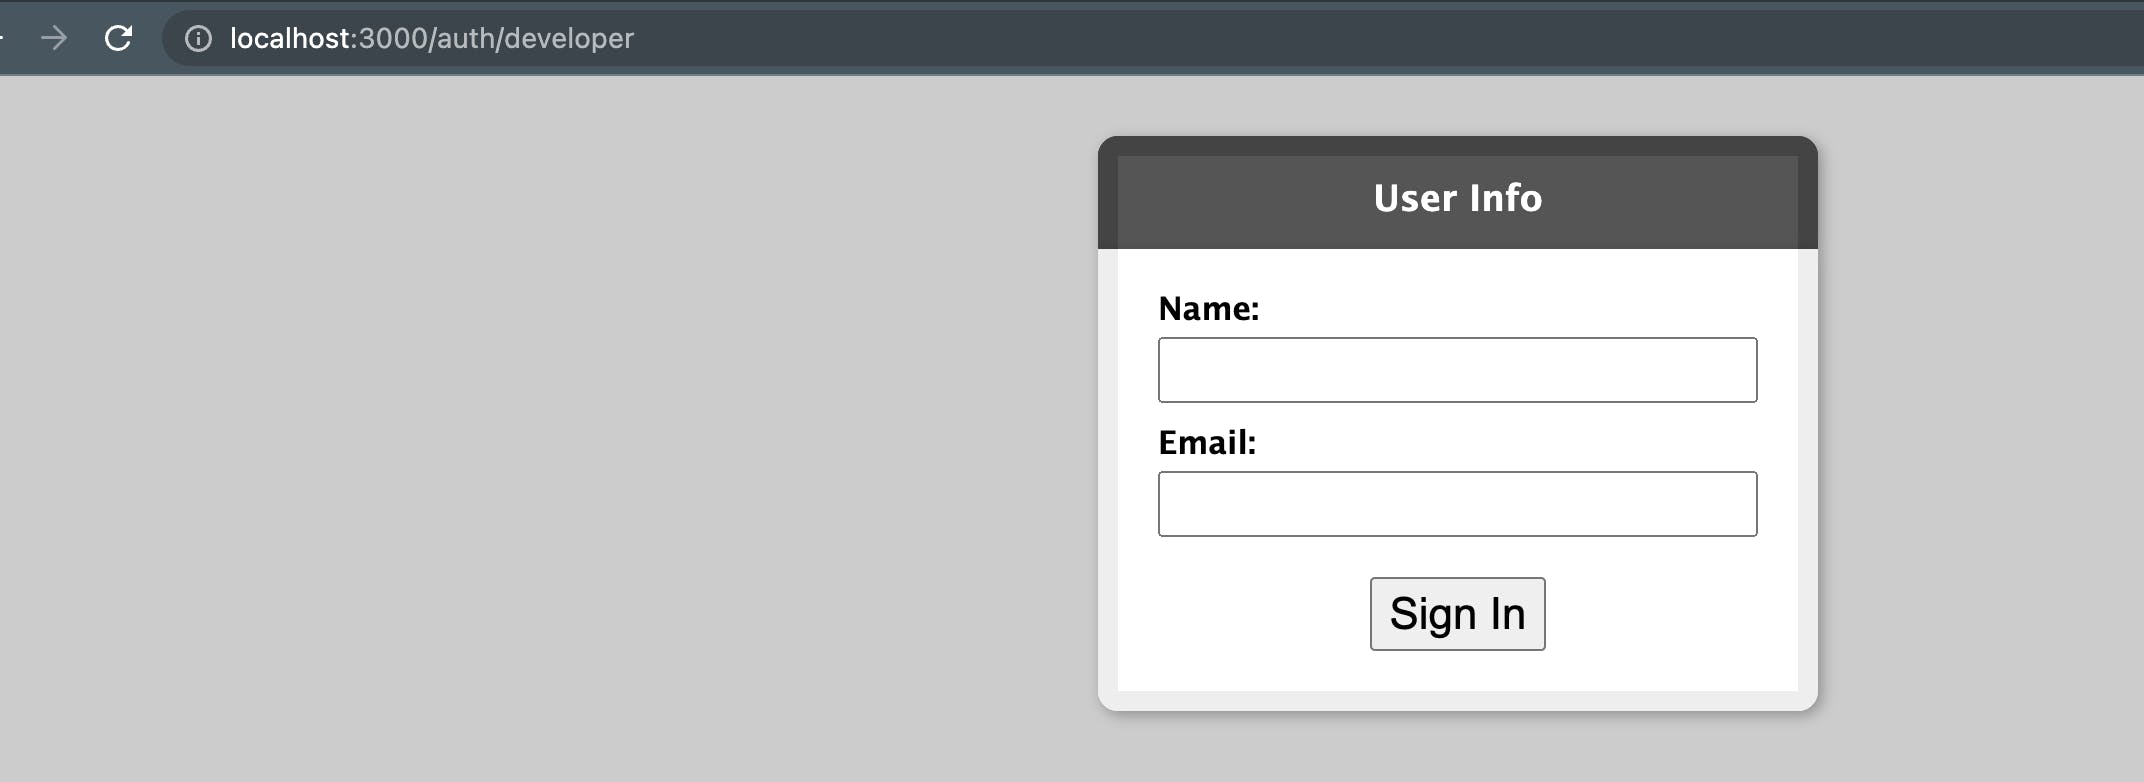
This page simulates what a third party login service might look like. Type in your name and email and test it out.
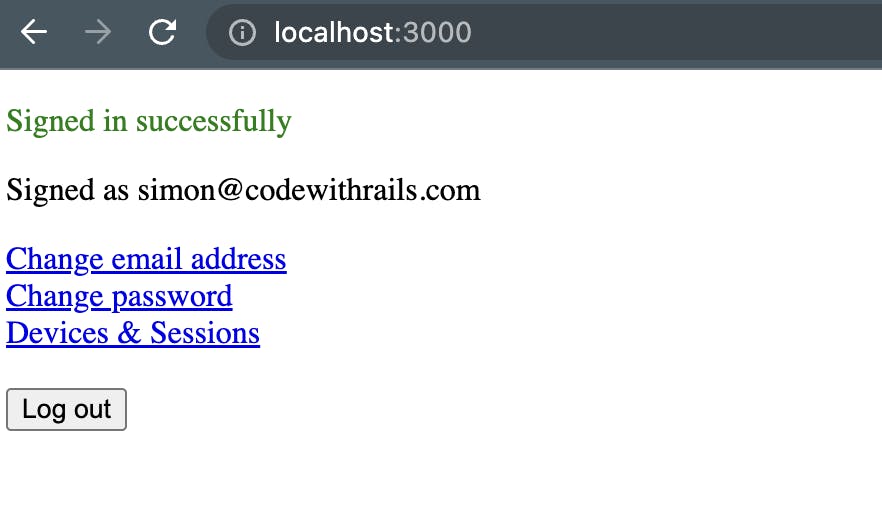
You should now be logged in and see the following screen:
That's neat! Now let's try and hook things up with a third party service like GitHub.
To get started, head to your GitHub settings and scroll down to the Developer section:
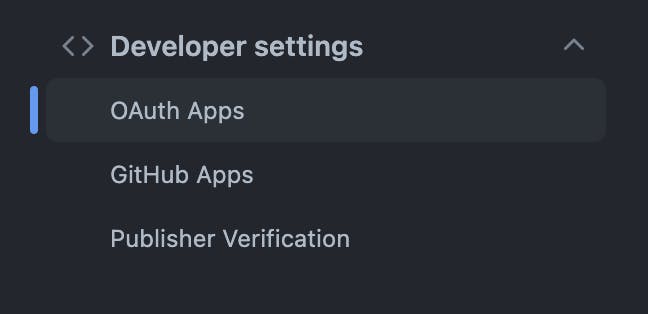
From there, click on OAuth apps. You should then be able to create a new OAuth app:

And fill out the details like so:
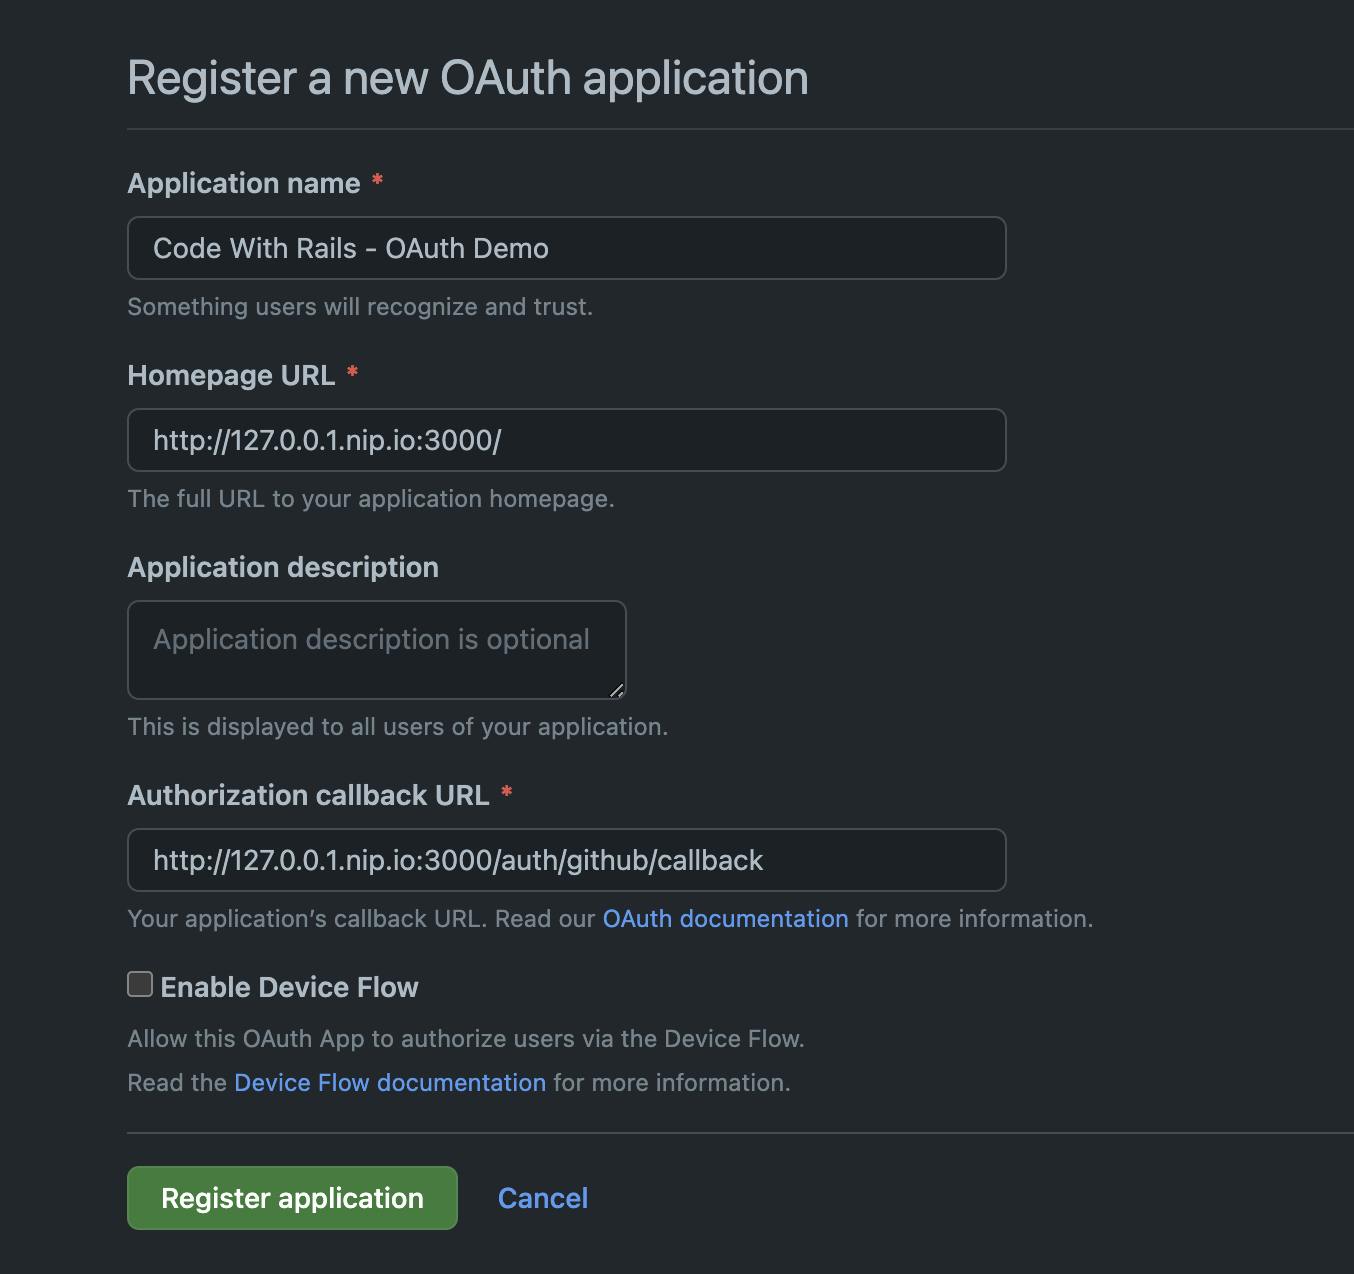
You will notice that we've entered, for the domain, 127.0.0.1.nip.io:3000. GitHub's OAuth settings here do not allow us to use localhost. Fortunately, nip.io allows us to dynamically map domains. See https://nip.io for details.
Once you're done, you can generate the OAuth secret to use like so:
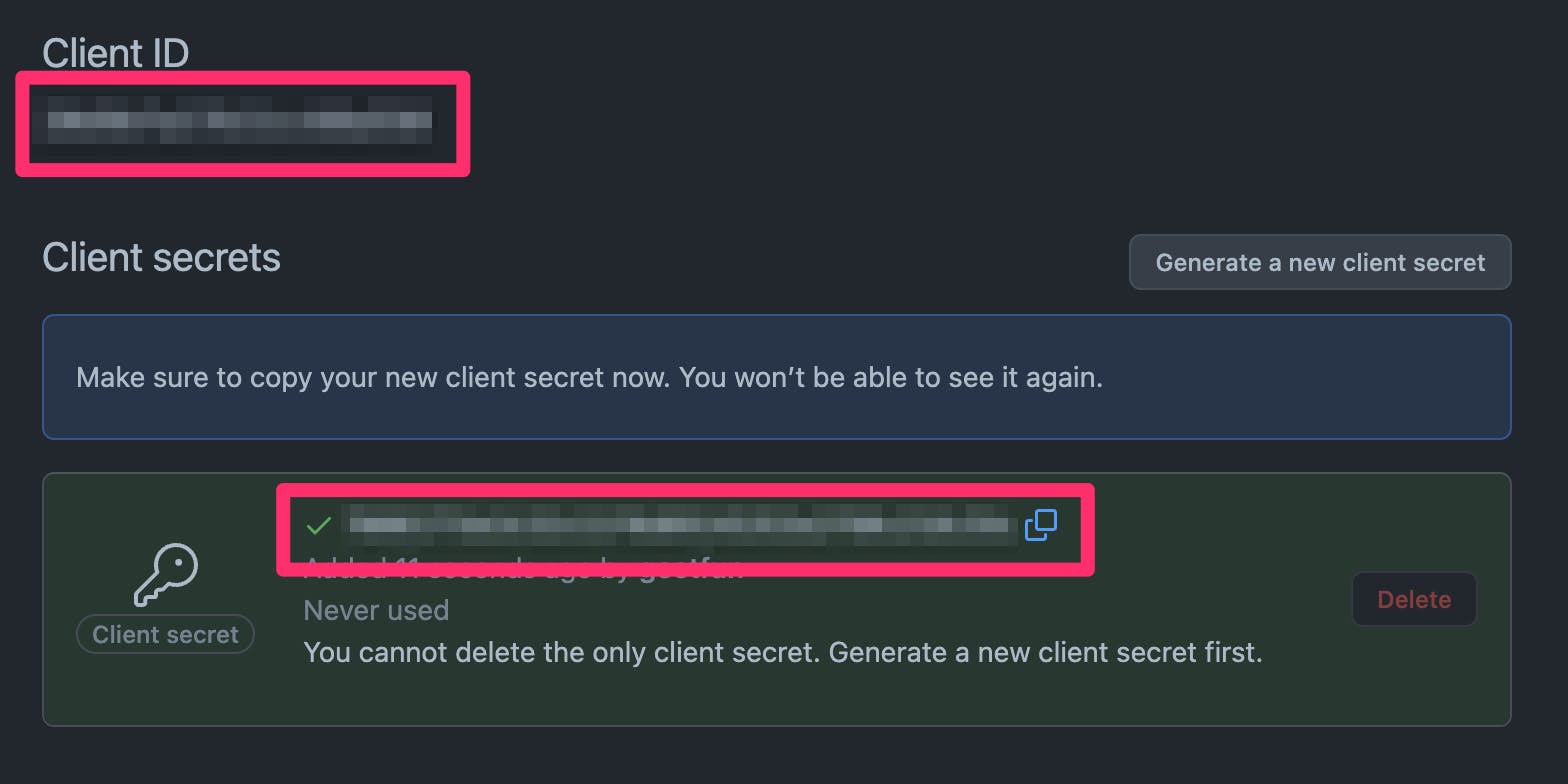
You'll notice in the above screenshot (with the redacted values) the values for the client ID and secret. Take note of these, because you'll need to modify the omniauth.rb initializer in the next step:
# config/initializers/omniauth.rb
Rails.application.config.middleware.use OmniAuth::Builder do
  provider :github, 'client_id', 'client_secret', scope: 'user:email'
end
Replace client_id and client_secret with your values.
⚠️ Note: In a real production app, these values should be read from environment variables or using Rails encrypted secrets. However, for the purpose of this tutorial, we're just entering them in here for brevity.
Also, take note that we've also added a scope argument here. This is to tell GitHub what information we need from the user's account. Specifically here, we want the user's email. It is good practice to not request more than what you need. For a full list of GitHub OAuth scopes, take a look at the GitHub OAuth documentation.
At this step, we're almost done. We just need to modify our views:
# app/views/sessions/new.html.erb
#
# Find the following line:
<%= button_to "Sign in with OmniAuth", "/auth/developer", "data-turbo" => false %>

# And change it to:
<%= button_to "Sign in with GitHub", "/auth/github", "data-turbo" => false %>
Finally, we'll need to use a GitHub OmniAuth provider library. Add the following to your Gemfile, and then run bundle install:
# Gemfile
gem 'omniauth-github', '~> 2.0', '>= 2.0.1'
Once all this is done, restart the web server and we should be ready to test things out.
Let's head onto 127.0.0.1.nip.io:3000:
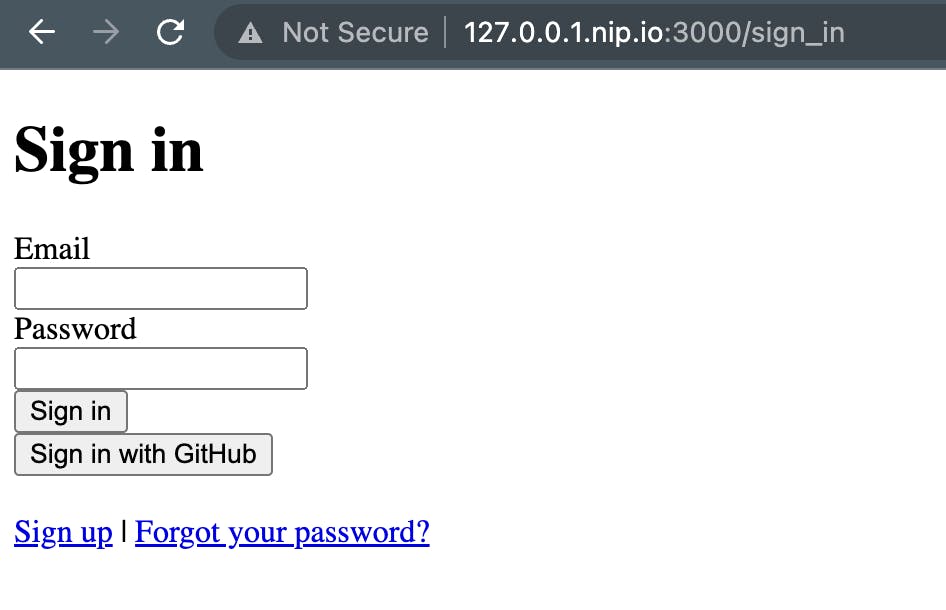
Click on Sign in with GitHub, which should now redirect you to the GitHub OAuth page:
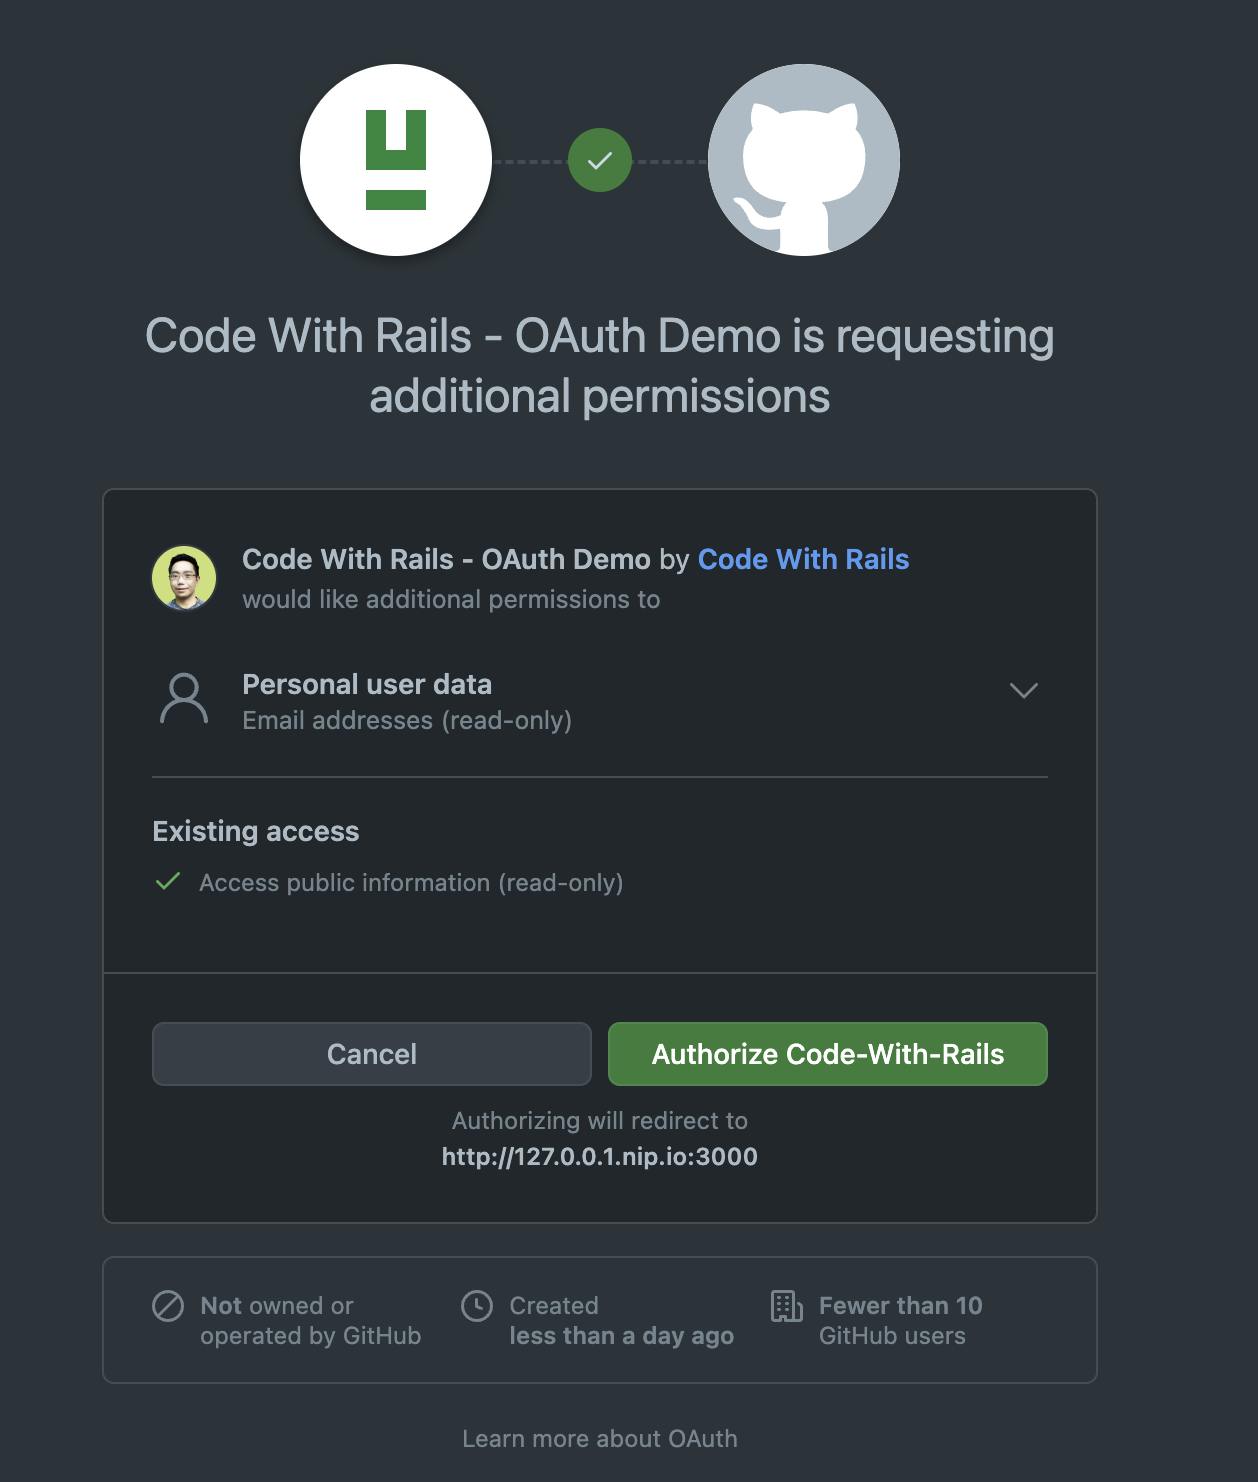
Notice that the above page will clearly specify what scope (in this case, the user's email) you're requesting to access.
Finally, if we click on Authorize Code-With-Rails, we get redirected back to our app as a logged in user:
Let's take a closer look at the Sessions::OmniauthController (located in your app's folder at app/controllers/sessions/omniauth_controller.rb) on how this is handled:
# app/controllers/sessions/omniauth_controller.rb
def create
  @user = User.where(omniauth_params).first_or_initialize(user_params)

  if @user.save
    session = @user.sessions.create!
    cookies.signed.permanent[:session_token] = { value: session.id, httponly: true }

    redirect_to root_path, notice: "Signed in successfully"
  else
    redirect_to sign_in_path, alert: "Authentication failed"
  end
end
The Ruby code is quite simple to understand, but let's break it down line-by-line.
First, a User model is instantiated. If an existing user with the passed-along omniauth params is found, then we choose that record. If one isn't found, then it is deemed a new user.
Here's the code for omniauth_params:
def omniauth_params
  { provider: omniauth.provider, uid: omniauth.uid }
end
The uid is a unique value that stays the same for a specific user from GitHub (or whichever third-party service you're integrating with).
With first_or_initialize, we either have a record or not. If we don't, a new record is created with user_params.
The user_params method is defined just below like so:
def user_params
  { email: omniauth.info.email, password: SecureRandom::base58, verified: true }
end
This method is a bit interesting, because we see that a random value is used for the user's password. What's happening here is that if a user is new, that user's initial password value will be unknown. That user will need to do a proper password reset in order to set a new password and login through the usual email & password form. If they don't, then they will only have the option of authenticating through OAuth.
And that's how Authentication Zero has generated the code needed for OAuth authentication.
How Two Factor Authentication (2FA) is handled
In the previous example above in the SessionsController, we see a redirection when user.otp_secret evaluates to true.
Let’s take a closer look at the code:
if user.otp_secret
  signed_id = user.signed_id(purpose: :authentication_challenge, expires_in: 20.minutes)
  redirect_to new_two_factor_authentication_challenge_path(token: signed_id)
else
  #…
 end
We see above that a signed_id local variable is assigned, and this is passed on as a params to the new_two_factor_authentication_challenge_path.
Let’s take a look at what happens at that path. This is the view that is rendered there:
<p style="color: red"><%= alert %></p>

<%= form_with(url: two_factor_authentication_challenge_path) do |form| %>
  <%= form.hidden_field :token, value: params[:token] %>

  <div>
    <%= form.label :code do %>
      <h1>Next, open the 2FA authenticator app on your phone and type the six digit code below:</h1>
    <% end %>
    <%= form.text_field :code, autofocus: true, required: true, autocomplete: :off %>
  </div>

  <div>
    <%= form.submit "Verify" %>
  </div>
<% end %>
In the TwoFactorAuthentication::ChallengesController, we see how the code params is verified:
# app/controllers/two_factor_authentication/challenges_controller.rb
def create
  @totp = ROTP::TOTP.new(@user.otp_secret, issuer: 'Code With Rails Demo')

  if @totp.verify(params[:code], drift_behind: 15)
    session = @user.sessions.create!
    cookies.signed.permanent[:session_token] = { value: session.id, httponly: true }

    redirect_to root_path, notice: 'Signed in successfully'
  else
    redirect_to new_two_factor_authentication_challenge_path(token: params[:token]),
                alert: 'That code didn\'t work. Please try again'
  end
end
We see here that params[:code] is verified, and if it didn't work then we get redirected back to try again.
Similar to the OAuth code paths, the code is easily understandable (and modifiable if you wish).
Sudo Actions
Let’s take a look at how sudo (“superuser” do) actions are handled.
Sudo actions are those endpoints which require users to enter their password before a sensitive action can can be performed. Examples of this typically include:
Changing an existing password
Deleting records
Performing administrative functions
Again, Authentication Zero handles this with native Rails and kredis support.
Kredis — if you’re not familiar — is a library extracted from Basecamp/Hey which is used for storing “more complex” data structures into Redis. You can read about the gem and its functionality on its README page (which is quite well written).
Essentially, the Session model (generated by Authentication Zero) leverages Kredis to “mark” a session as having been sudo authenticated.
class Session < ApplicationRecord
  #…
  kredis_flag :sudo, expires_in: 30.minutes

  after_create_commit do
    self.sudo.mark
  end
  #…
What we see here is that immediately after logging in (ie. a Session object is created), we mark the sudo kredis attribute.
The #mark method is provided by kredis:
flag = Kredis.flag "myflag"
false == flag.marked?           # => EXISTS myflag
flag.mark                       # => SET myflag 1
true == flag.marked?            # => EXISTS myflag
flag.remove                     # => DEL myflag
false == flag.marked?           # => EXISTS myflag
With the way things are implemented, we see that Kredis will automatically expire the value after 30 minutes. Thus after the value has expired, the user will need to re-enter their password to regain sudo status.
The gem’s generator also creates a convenience method in the ApplicationController:
def require_sudo
  unless Current.session.sudo?
    redirect_to new_sessions_sudo_path(proceed_to_url: request.url)
  end
end
You can use a before_action :require_sudo to protect any controller actions that require sudo status. The targeted sudo verification is also just regular Rails controllers and views — no hidden controllers or Rails magic here.
As you can see, with a minimal set of code, a powerful functionality is now available to you. More importantly, the generated code is easy to follow and understand, and expand in functionality when you require it.
Why I like this approach
For years, it's almost dogmatic that a library such as Devise should be added to new Rails applications.
However, I've seen how apps evolve over time where authentication logic needs to be customized. And in every single case, the authentication becomes messier because the authentication library no longer fits what the app owners want it to do.
Authentication is such an essential part of web applications, and Rails + Authentication Zero make it incredibly easy to own your code and understand how all the pieces fit together. Notice how the gem (Authentication Zero) was removable once the initial code was generated.
I encourage you to take a serious look at owning your authentication code in your next new Rails app. It may surprise you at how much better (and leaner) you can make your app and codebase without sacrificing security.