Imagine you have a form in your Rails app which is backed by an ActiveRecord model. In this form there are a bunch of checkboxes, the values of which you want to persist to your database. How do you go about handling this scenario?
As ever, the code for this article can be found on our GitHub repo.
The Anti-Pattern
Well, an initial reaction might be to create a string column in the database to hold all of the checkbox data. You could then use a before_save hook in the model to build the string and use check_box_tag helpers in the view to display the check boxes.
Let’s have a quick look at what this might look like. To do so, we’ll create a demo app into which you can enter the name of a professor and select their various areas of expertise.
rails new cb-demo && cd cb-demo
rails g scaffold professor name:string expertise:string
rake db:migrate
After that open up /app/views/professors/_form.html.erb and replace:
<%= f.label :expertise %><br>
<%= f.text_field :expertise %>
with:
<%= label_tag 'expertise_physics', 'Physics' %>
<%= check_box_tag 'professor[expertise][]', 'Physics', checked('Physics'), id: 'expertise_physics' %>

<%= label_tag 'expertise_maths', 'Maths' %>
<%= check_box_tag 'professor[expertise][]', 'Maths', checked('Maths'), id: 'expertise_maths' %>
In /app/controllers/professors_controller.rb alter:
params.require(:professor).permit(:name, :expertise)
to:
params.require(:professor).permit(:name, expertise:[])
Then in /app/models/professor.rb add:
before_save do
  self.expertise.gsub!(/[\[\]\"]/, "") if attribute_present?("expertise")
end
And in /app/helpers/professors_helper.rb add:
def checked(area)
  @professor.expertise.nil? ? false : @professor.expertise.match(area)
end
Finally, run rails s and navigate to http://localhost:3000/professors
And as you can see, it works. But unfortunately, that’s about all it does. Saving checkbox data to the database this way will just cause problems further down the road. For example as the number of professors and the number of areas of expertise grow, queries to find out which profs are assosciated with which areas will become a horrific mess.
Also what happens if you want to delete or rename an area of expertise? In this case you’d have to manipulate the database directly, which is almost never a good thing (not to mention time consuming and error-prone).
The Right Way
Luckily, there is a much better way to accomplish this — namely by moving Expertise into its own model and declaring a has_and_belongs_to_many association between Expertise and Professor. This will create a direct many-to-many connection between the models (by means of a join table — a database table that maps two or more tables together by referencing the primary keys of each data table).
A has_and_belongs_to_many association creates a direct many-to-many connection with another model, with no intervening model. For example, if your application includes assemblies and parts, with each assembly having many parts and each part appearing in many assemblies, you could declare the models this way:
You can visualize it like so (where expertises_professors is the join table):
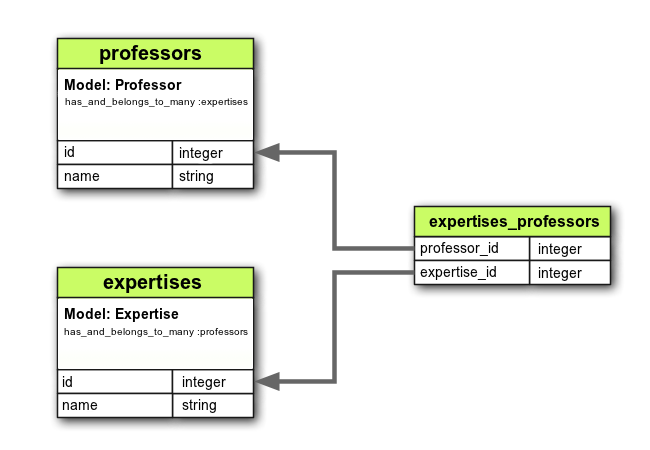
The join table does not have a primary key or a model associated with it and must be manually generated.
To demonstrate this, we’ll recreate the same small project as before:
rails new cb-demo-1 && cd cb-demo-1
rails g scaffold professor name:string
rails g scaffold expertise name:string
rails g migration CreateJoinTableExpertiseProfessor expertise professor
rake db:migrate
This will create the necessary models and database tables. You might also notice the generator which produces the join table for us (provided JoinTable is part of the name). Nifty, huh?
Next we need to declare the associations in the respective models:
In /app/models/professor.rb add:
has_and_belongs_to_many :expertises
In /app/models/expertise.rb add:
has_and_belongs_to_many :professors
Declaring the has_and_belongs_to_many association puts a bunch of new methods at our fingertips, for example: Professor#expertises, Professor#expertises.find(id), Professor#expertises<< and Professor#expertises.delete. You can read more about these in the api documentation.
After that we need to whitelist expertise_ids in /app/controllers/professors_controller.rb:
params.require(:professor).permit(:name, expertise_ids:[])
Finally add the following to /app/views/professors/_form.html.erb:
<div class="field">
  <%= f.label "Area of Expertise" %><br />
  <%= f.collection_check_boxes :expertise_ids, Expertise.all, :id, :name do |b| %>
    <div class="collection-check-box">
      <%= b.check_box %>
      <%= b.label %>
    </div>
  <% end %>
</div>
Here we are making use of a special form options helper, which was introduced in Rails 4, called collection_check_boxes. It behaves similarly to collection_select, but instead of a single select field it renders a checkbox and a label for each item in the collection.
You can also customize the output (as we are doing here) by passing it a block. The block will be called with a special builder object that itself has a handful of special methods.
And that’s really all there is to it. If you fire up WEBrick and navigate to http://localhost:3000/expertises, you’ll be able to enter a few areas of expertise and save them to the database. After that, you can head to http://localhost:3000/professors and everything should work as expected — that is, you’ll be able to create professors and assign them to whichever areas of expertise you created previously. After that, if you try and edit a professor, you’ll see that the areas of expertise have been persisted.
Everyone’s a Winner, Baby!
With things set up this way, ascertaining which professors are associated with which areas of expertise is a doddle:
rails c
e = Expertise.first

e.professors
=> #<ActiveRecord::Associations::CollectionProxy [#<Professor id: 1, name: "Jim", created_at: "2015-08-20 20:04:51", updated_at: "2015-08-20 20:04:51">]>

e.professors.count
=> 1
Sorted!
And it’s quite straight-forward to add, rename or delete areas of expertise, via our simple web interface. Which brings me on to a final point: the chances are that if you delete an area of expertise, then you probably no longer want any professors to be associated with it. With our original method, this would have been messy to implement, however with this approach, all we need do is set dependent: :destroy on the association:
In /app/models/expertise.rb add:
has_and_belongs_to_many :professors, dependent: :destroy
Now, if you delete an area of expertise, no professors will be associated with it. The same thing obviously works the other way round.
Taking it Further
To further demonstrate the flexibility of this method, let’s finish with a demo showing how to use our checkboxes to filter database search results. To do that we’ll need some kind of search functionality for which we’ll use the Ransack gem. This gem provides excellent helpers and builders for handling searches on your models. To find out more about Ransack, check out: Advanced Search with Ransack
This demo builds on the code from the previous demo.
First add Ransack to your gemfile:
gem 'ransack'
and run:
bundle install
With that done, we’ll need to alter the index action in ProfessorsController, which is where we want to add our search functionality. We can make a search object here by calling Professor.search and passing in the q parameter, which will contains a hash of the search parameters submitted by the user. To get any professors matching our search, we can just call result on this object. Specifying distinct: true avoids returning duplicate rows.
In /app/controllers/professors_controller.rb:
def index
  @search = Professor.search(params[:q])
  @professors = @search.result(distinct: true)
end
Next we need to make the search form. Ransack provides a form builder for doing this called search_form_for. Just like Rails form_for this method takes a block in which we can define the fields we want to search against. Naming the text field in the form :name_cont means that Ransack will search for professors whose name contains the value entered into this field.
<%= search_form_for @search do |f| %>
  <%= f.label :name_cont, "Name contains" %>
  <%= f.text_field :name_cont %>
<% end %>
Next we need to add the ability to filter by area of expertise:
<%= f.label "Area of Expertise" %><br />
<%= f.collection_check_boxes :expertises_id_in_any, Expertise.all, :id, :name do |b| %>
  <div class="collection-check-box">
    <%= b.check_box %>
    <%= b.label %>
  </div>
<% end %>
You can see that we are again making use of the collection_check_boxes form helper, but this time we are passing in :expertises_id_in_any as a second parameter. This is what Ransack refers to as a predicate which it will use in its search query when determining what information to match. You can read more about predicates in the Ransack wiki.
Here’s the complete form. Add this to /app/views/professors/index.html.erb:
<fieldset class="search-field">
  <legend>Search Our Database</legend>
  <%= search_form_for @search do |f| %>
    <div class="field">
      <%= f.label :name_cont, "Name contains" %>
      <%= f.text_field :name_cont %>
    </div>

    <div class="field">
      <%= f.label "Area of Expertise" %><br />
      <%= f.collection_check_boxes :expertises_id_in_any, Expertise.all, :id, :name do |b| %>
        <div class="collection-check-box">
          <%= b.check_box %>
          <%= b.label %>
        </div>
      <% end %>
    </div>

    <div class="actions"><%= f.submit "Search" %></div>
  <% end %>
</fieldset>
While we’re at it, we can also alter the table (in the same file) to include a professor’s areas of expertise:
<table>
  <thead>
    <tr>
      <th>Name</th>
      <th>Expertises</th>
      <th colspan="3"></th>
    </tr>
  </thead>

  <tbody>
    <% @professors.each do |professor| %>
      <tr>
        <td><%= professor.name %></td>
        <td><%= professor.expertises.map(&:name).sort.join(", ") %></td>
        <td><%= link_to 'Show', professor %></td>
        <td><%= link_to 'Edit', edit_professor_path(professor) %></td>
        <td><%= link_to 'Destroy', professor, method: :delete, data: { confirm: 'Are you sure?' } %></td>
      </tr>
    <% end %>
  </tbody>
</table>
Now we can search for professors by name and filter them by their areas of expertise. Can you imagine how complicated this would have been if had the checkbox values stored in a string column in the database?
Note: a slight caveat is that Ransack doesn’t produce the correct results for _all queries on a HABTM association. In the above example expertises_id_in_all would return an empty result set (meaning you cannot match only those professors whose area of expertise corresponds exactly to the boxes you have checked). For more information on this, you can read this Stackoverflow thread and this issue on the project’s homepage.
Conclusion
With that, I hope I have demonstrated how to correctly store checkbox values in a database in Rails and the numerous of advantages this approach brings.
If you have any questions or comments, I’d be glad to hear them below and don’t forget, the code for this article can be found on our GitHub repo.
Frequently Asked Questions (FAQs) about Saving Multiple Checkbox Values in Rails
How can I save multiple checkbox values in Rails using a single table?
In Rails, you can save multiple checkbox values using a single table by creating a form with checkboxes for each value. Each checkbox should have a unique value that corresponds to a record in the table. When the form is submitted, Rails will automatically save the checked values in the table. You can use the params method to access these values in your controller and save them to the database.
What is the role of the params method in saving multiple checkbox values in Rails?
The params method in Rails is used to access the data sent by the client to the server. When a form with multiple checkboxes is submitted, the params method can be used to access the checked values. These values can then be saved to the database using the save method.
How can I set a default value for a checkbox in Rails?
In Rails, you can set a default value for a checkbox using the check_box helper method. This method takes two arguments: the object name and the method name. The method name should return a boolean value that determines whether the checkbox is checked or not. If the method returns true, the checkbox will be checked by default.
How can I handle multiple checked checkboxes in Rails?
Handling multiple checked checkboxes in Rails involves accessing the checked values using the params method and saving them to the database. You can iterate over the checked values using the each method and save each value to the database.
How can I use the check_box_tag helper method in Rails?
The check_box_tag helper method in Rails is used to create a checkbox input field. This method takes three arguments: the name of the input field, the value of the checkbox, and a boolean value that determines whether the checkbox is checked or not. You can use this method to create multiple checkboxes with different values.
How can I validate the data from multiple checkboxes in Rails?
In Rails, you can validate the data from multiple checkboxes using the validates method in your model. This method can be used to ensure that at least one checkbox is checked before the form is submitted.
How can I use the params method to access the checked values of multiple checkboxes in Rails?
The params method in Rails can be used to access the checked values of multiple checkboxes. When a form with multiple checkboxes is submitted, the params method will return a hash that contains the checked values. You can access these values using the keys of the hash.
How can I use the save method to save the checked values of multiple checkboxes in Rails?
The save method in Rails can be used to save the checked values of multiple checkboxes to the database. After accessing the checked values using the params method, you can save each value to the database using the save method.
How can I create a form with multiple checkboxes in Rails?
In Rails, you can create a form with multiple checkboxes using the form_for helper method. Inside the form, you can use the check_box or check_box_tag helper methods to create the checkboxes. Each checkbox should have a unique value that corresponds to a record in the table.
How can I update the checked values of multiple checkboxes in Rails?
In Rails, you can update the checked values of multiple checkboxes using the update method. After accessing the checked values using the params method, you can update each value in the database using the update method.
 James Hibbard
Network admin, freelance web developer and editor at SitePoint.