This article was peer reviewed by Thom Parkin. Thanks to all of SitePoint’s peer reviewers for making SitePoint content the best it can be!

ReCAPTCHA is a free service from Google that helps protect websites from spam and abuse. A “CAPTCHA” is a test to tell humans and robot apart. This kind of service is important for websites or web applications with lots of user generated content. The test is easy for a human to solve, but hard for bots and other malicious software to figure out.
In this tutorial, I will show you how to integrate ReCAPTCHA to your Rails application using ReCAPTCHA gem. You will also see how to add it to Devise.
Let’s get started!
ReCAPTCHA Setup
First, you need to obtain a ReCAPTCHA API Key. I presume that you have a Google account already, but if not, sign up for one.
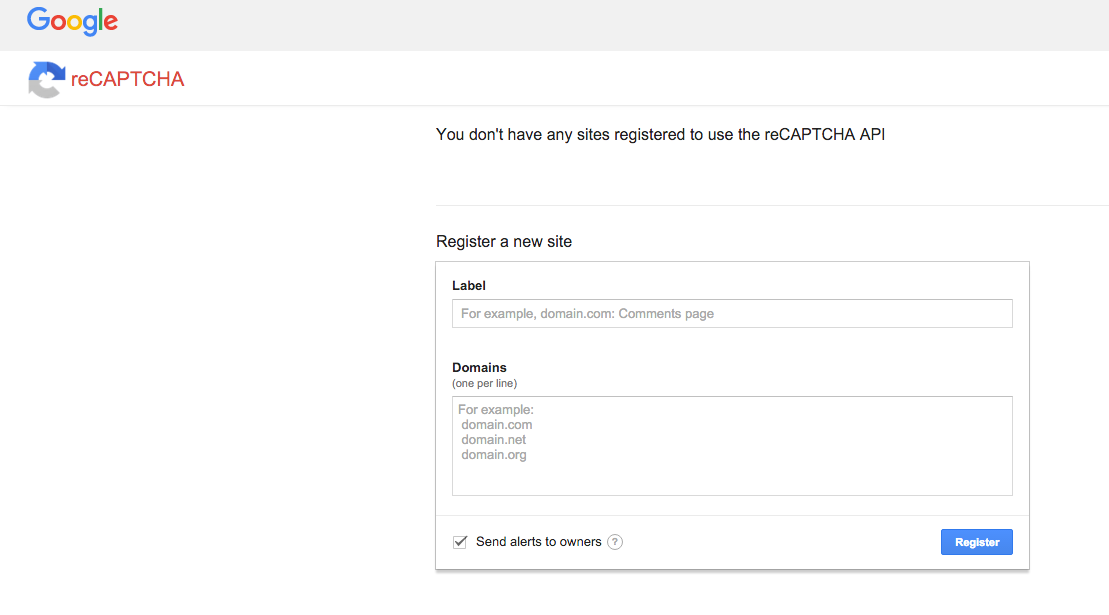
On the ReCAPTCHA page, enter the details of your application and click Register. You will be presented with a page that contains your site key and secret key. Copy those to a safe location, it is wise to prevent these keys from being checked into source control.
Rails Application Setup
From your terminal generate a new rails application
rails new mypets
And bundle install
I chose Pets because I like dogs and I hope to get two soon :)
Let us generate a scaffold for our application:
class='language-bash'rails g scaffold Pet name:string pets_type:string
Then migrate your database:
class='language-bash'rake db:migrate
Integrating ReCAPTCHA
Add the following gems to your Gemfile and bundle install:
#Gemfile
gem 'dotenv-rails', :require => 'dotenv/rails-now'

gem "recaptcha", require: "recaptcha/rails"
Create a .env file in the root folder of your project and paste your ReCAPTCHA keys in there:
RECAPTCHA_PUBLIC_KEY = '<YOUR PUBLIC KEY>'
RECAPTCHA_PRIVATE_KEY = '<YOUR PRIVATE KEY>'
Save the file. Open .gitignore and add .env. This ensures your secret keys will not be part of the commit so they are not publicly visible in your git repo.
Configuring Views for ReCAPTCHA
First navigate to your controller and edit the create action to look like this:
#app/controllers/pets_controller.rb

def create
  @pet = Pet.new(pet_params)

  respond_to do |format|
    if verify_recaptcha(model: @pet) && @pet.save
      format.html { redirect_to @pet, notice: 'Pet was successfully created.' }
      format.json { render :show, status: :created, location: @pet }
    else
      format.html { render :new }
      format.json { render json: @pet.errors, status: :unprocessable_entity }
    end
  end
end
This will ensure that a new pet object is not created if ReCAPTCHA is not verified.
Let us move to the views.
Open app/views/pets/_form.html.erb and add a reCAPTCHA tag:
#app/views/pets/_form.html.erb

<%= form_for(@pet) do |f| %>
  <% if @pet.errors.any? %>
    <div id="error_explanation">
      <h2><%= pluralize(@pet.errors.count, "error") %> prohibited this pet from being saved:</h2>

      <ul>
      <% @pet.errors.full_messages.each do |message| %>
        <li><%= message %></li>
      <% end %>
      </ul>
    </div>
  <% end %>

  <div class="field">
    <%= f.label :name %><br>
    <%= f.text_field :name %>
  </div>
  <div class="field">
    <%= f.label :pets_type %><br>
    <%= f.text_field :pets_type %>
  </div>
  <div>
    <%= recaptcha_tags %> <!-- THIS -->
  </div>
  <div class="actions">
    <%= f.submit %>
  </div>
<% end %>
Start up the rails server (rails s) and point your browser to http://localhost:3000/pets/new to see reCAPTCHA at work.
ReCAPTCHA and Devise
Devise is a flexible authentication solution for Rails. In this part, I will show you how to integrate ReCAPTCHA with your Devise model.
Add devise to your Gemfile and bundle install.
# Gemfile
... other gems ...
gem `devise`
Install devise:
rails generate devise:install
Next let generate your User model:
rails generate devise User
Migrate your database
rake db:migrate
We will need to edit devise views so generate that too.
rails generate devise:views
Open your application layout using your text editor and paste this in, just below the body opening tag.
#app/views/layouts/application.html.erb

<p class="notice"><%= notice %></p>
<p class="alert"><%= alert %></p>
Integrating ReCAPTCHA
For ReCAPTCHA to work, you will need to edit the create action in your controller like you did above. We’ll also need to make some changes in the Devise controllers.
Follow me.
Run this generator from your terminal:
rails generate devise:controllers users
This will create a controllers/users folder with all devise controllers contained in it.
Using your text editor, open app/controllers/users/registrations_controller.rb and edit the create action to look like this:
#app/controllers/users/registrations_controller.rb

def create
 if !verify_recaptcha
    flash.delete :recaptcha_error
    build_resource(sign_up_params)
    resource.valid?
    resource.errors.add(:base, "There was an error with the recaptcha code below. Please re-enter the code.")
    clean_up_passwords(resource)
    respond_with_navigational(resource) { render_with_scope :new }
  else
    flash.delete :recaptcha_error
    super
  end
end
Now navigate to app/views/devise/registrations/new.html.erb and add the ReCAPTCHA tag, so it looks like this:
#app/views/devise/registrations/new.html.erb

<h2>Sign up</h2>

<%= form_for(resource, as: resource_name, url: registration_path(resource_name)) do |f| %>
  <%= devise_error_messages! %>

  <div class="field">
    <%= f.label :email %><br />
    <%= f.email_field :email, autofocus: true %>
  </div>

  <div class="field">
    <%= f.label :password %>
    <% if @minimum_password_length %>
    <em>(<%= @minimum_password_length %> characters minimum)</em>
    <% end %><br />
    <%= f.password_field :password, autocomplete: "off" %>
  </div>

  <div class="field">
    <%= f.label :password_confirmation %><br />
    <%= f.password_field :password_confirmation, autocomplete: "off" %>
  </div>

  <div class="field">
    <%= recaptcha_tags %>
  </div>

  <div class="actions">
    <%= f.submit "Sign up" %>
  </div>
<% end %>

<%= render "devise/shared/links" %>
Now with your browser pointed to http://localhost:3000/users/sign_up you will see ReCAPTCHA in action.
Conclusion
In this tutorial you have learned how to integrate ReCAPTCHA to your Rails application. I felt that adding the bits about Devise might be especially helpful, as it is such a popular gem. Try adding some ReCAPTCHA-based security to your app and let me know how it goes.
I like to write up quick-hitting topics like this one that can be applied immediately with tangible benefit. I hope you enjoyed it.
Frequently Asked Questions (FAQs) about Adding reCAPTCHA to Your Rails Application
What is the Importance of Adding reCAPTCHA to My Rails Application?
reCAPTCHA is a free service provided by Google that helps protect your website from spam and abuse. It uses an advanced risk analysis engine and adaptive challenges to keep automated software from engaging in harmful activities on your site. It does this while letting your valid users pass through with ease. By adding reCAPTCHA to your Rails application, you can ensure that the interactions on your site are genuine and not generated by bots.
How Do I Get the Site Key and Secret Key for reCAPTCHA?
To get the site key and secret key for reCAPTCHA, you need to register your site with Google’s reCAPTCHA service. Visit the reCAPTCHA website, click on the ‘Admin Console’ button, and sign in with your Google account. After signing in, you’ll be prompted to register a new site. Enter your domain name, select the type of reCAPTCHA you want to use, and accept the terms of service. After registration, you’ll be provided with a site key and a secret key.
How Do I Add reCAPTCHA to My Rails Application Without a Gem?
To add reCAPTCHA to your Rails application without using a gem, you need to manually integrate the reCAPTCHA API into your application. This involves adding the reCAPTCHA script to your form, verifying the user’s response on the server side, and handling the verification result. While this method gives you more control over the integration process, it requires a good understanding of how the reCAPTCHA API works.
What is the Difference Between reCAPTCHA v2 and v3?
reCAPTCHA v2 requires the user to click on a checkbox indicating they’re not a robot, while reCAPTCHA v3 works in the background and doesn’t require any user interaction. Instead, reCAPTCHA v3 returns a score indicating the likelihood that the user is a bot. You can use this score to decide how to handle the user’s request.
How Do I Handle reCAPTCHA Errors in My Rails Application?
When verifying the user’s reCAPTCHA response on the server side, the reCAPTCHA API may return an error code. You should handle these errors by displaying an appropriate message to the user. For example, if the API returns the error code ‘invalid-input-response’, you can display a message like “The reCAPTCHA verification failed. Please try again.”
Can I Customize the Look of reCAPTCHA on My Site?
Yes, you can customize the look of reCAPTCHA v2 by choosing between the ‘Light’ and ‘Dark’ themes when registering your site with the reCAPTCHA service. However, reCAPTCHA v3 doesn’t have a user-facing component, so it can’t be customized in the same way.
How Do I Test reCAPTCHA on My Local Development Environment?
To test reCAPTCHA on your local development environment, you can use the special site key and secret key provided by Google for testing purposes. These keys will always pass the reCAPTCHA verification regardless of the user’s input.
How Do I Upgrade from reCAPTCHA v2 to v3?
To upgrade from reCAPTCHA v2 to v3, you need to register your site again with the reCAPTCHA service and select reCAPTCHA v3 as the type. After registration, you’ll be provided with a new site key and secret key. Replace the old keys in your Rails application with the new ones, and update your code to handle the reCAPTCHA v3 score.
What Should I Do If reCAPTCHA Is Not Working on My Site?
If reCAPTCHA is not working on your site, first check if you’ve entered the correct site key and secret key in your Rails application. Also, make sure that the reCAPTCHA script is correctly added to your form. If you’re still having issues, you can check the reCAPTCHA API response for any error codes.
How Do I Protect My Site from reCAPTCHA Bypass Attempts?
To protect your site from reCAPTCHA bypass attempts, you should always verify the user’s reCAPTCHA response on the server side. Never rely solely on the client-side validation. Also, monitor the reCAPTCHA scores and adjust your site’s threshold value if necessary.
 Kingsley Silas
Kingsley Silas is a web developer from Nigeria. He has a hunger for acquiring new knowledge in every aspect he finds interesting.