
In this tutorial, I am going to show you how to use Ruby on Rails 4.2 and Dropzone to upload multiple files using drag and drop with AJAX. Dropzone is an awesome library that, in this author’s opinion, stands head and shoulders above the rest of the libraries that offer similar functionality.
Note that I am going to use plain Ruby on Rails without any other library or gems such as Paperclip or Carrierwave.
This tutorial is suitable for those who are coming from other programming languages and wish to explore Rails.
OK folks, let’s hit the road.
Prerequisites
I assume that:
- You know a bit about Object Oriented programming and how the three components of the MVC design pattern relate to each other.
- You are familiar with javascript, jQuery, and AJAX requests.
Tools We’ll Need
- Good browser debugging and introspection tools. I am using Firefox as the browser with Firebug installed to debug and control the interactions between javascript in the browser and Rails on the server.
- Any IDE or editor. I like either Rubymine or Sublime is fine, but Feel free to use your own.
- Ruby on Rails 4.2. To install Rails, visit (http://installrails.com/). I am going to use SQLite as the database. You can also use PostgreSQL, MySQL, or any other RDBMS.
- The Dropzone library itself. Go and download it from here.
- Twitter Bootstrap.
The Application
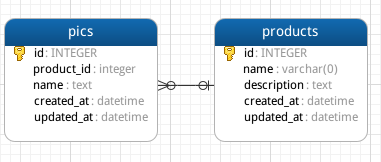
Our application is a module of an e-commerce shop to create products and attach pictures to them. It uploads the pictures on the server, returns the list of uploaded files, and then submits the form to create the product record. There is a one-to-many association between pictures and product, meaning that a product may have many images.
Here is the database schema:
Let’s jump to our code. First, make a new Rails application by opening your terminal and typing:
rails new myapp
We need to add the Javascript and CSS files for Dropzone and Bootstrap, so please go to the dist folder from the Dropzone and Bootstrap downloads and find the following files:
bootstrap.css
dropzone.css
basic.css
dropzone.js
Put dropzone.js into myapp/app/assets/javascripts and all the CSS files into myapp/app/assests/stylesheets. Open application.css and remove this line:
*= require_tree .
This line tells Rails to require everything in this directory and all subdirectories. We don’t want this to happen, so get rid of it. Then add this line:
*= require bootstrap
Which means to include bootstrap for our application. Close and save the file. Go to myapp/app/assets/javascripts, open application.js, and remove the following lines:
//= require turbolinks
//= require_tree .
For further information about //= require turbolinks please read this article. We aren’t going to use Turbolinks today. Save and close the file. Now go to app/views/layouts/application.html.erb and make a layout template for your app. Your final file should look like:
<!DOCTYPE html>
<html>
<head>
  <title>Myapp</title>
  <%= stylesheet_link_tag    'application', media: 'all', 'data-turbolinks-track' => true %>
  <%= javascript_include_tag 'application', 'data-turbolinks-track' => true %>
  <%= csrf_meta_tags %>
  <%= yield(:css) %> <!-- We use this section for our CSS files -->
</head>
<body>

<%= yield(:content) %><!-- For our main contents -->
<%= yield(:javascript) %><!-- We put our JavaScript tags here -->
</body>
</html>
Note that we have yielded three sections: css, content, and javascript. Open the terminal and enter the following command:
rails g controller Product new create
This will create two views in your app/views folder and a controller in app/controllers. Before moving on, go to myapp/config/initializers/assets.rb and add this line to the file:
Rails.application.config.assets.precompile += %w(dropzone.js basic.css dropzone.css)
to ensure that our third-party assets are precompiled with the rest of the app.
Now, I am going to write the client-side before moving on to the server-side implementation. Open app/views/new.html.erb and enter the following code:
This section includes the CSS files, basic.css and dropzone.css, which will be used for our drag and drop area:
<%= content_for(:css) do %>

<%= stylesheet_link_tag 'dropzone' %>
<%= stylesheet_link_tag 'basic' %>

<% end %>
Here, we include a form for the creation of a product and a drag-and-drop zone which lets the user to drag images:
<%=content_for(:content) do %>
  <div class="container">
    <div class="row">
    <p>This is the form for creation of your product.</p>
      <%= form_for :request, :url => request.base_url+'/product/create', html: {id:'myForm'} do %>
      <label for="name">Product Name:</label>
      <input type="text" name="name" id="name" class="form-control">
      <label for description> Description</label>
      <input type="text" name="description" id="description" class="form-control" /><br>
      <input type=hidden name="files_list" id='fileslist'>
      <!-- We use this <div> element to initialize our Dropzone -->
      <div id="mydropzone" class="dropzone"></div>
      <!-- This <div> elements shows a suitable message after a successful upload. -->
      <div id="msgBoard"></div>
      <br>
      <input type='submit' value="Create your product">
    </div>
  </div>
  <% end %>
<% end %>
<%= content_for(:javascript) do %>
<!-- include the dropzone library itself. -->
<%= javascript_include_tag "dropzone" %>
Here is the Javascript necessary to handle the drag and drop events and upload the form. I will explain each portion of the code as we go through it:
<script type="text/javascript">
  var AUTH_TOKEN=$('meta[name="csrf-token"]').attr('content');
Grab the CSRF token by jQuery and save it in AUTH_TOKEN variable:
  Dropzone.autoDiscover = false;
  var myDropzone = new Dropzone("div#mydropzone",{
    url: "<%= request.base_url %>/uploadfiles",
    autoProcessQueue: false,
    uploadMultiple: true,
    addRemoveLinks:true,
    parallelUploads:10,
    params:{
      'authenticity_token':  AUTH_TOKEN
    },
    successmultiple: function(data,response){
      $('#msgBoard').append(response.message).addClass("alert alert-success");
      $('#msgBoard').delay(2000).fadeOut();
      $('#fileslist').val(response.filesList);
      $('#myForm').off('submit').submit();
    }
  });
Initialize our drag and drop file uploader:
urlis route which handles the task to upload the images on the serverautoProcessQueue: falsestops the script from automatically uploading images after dragging themuploadMultiple: trueallows Dropzone to send multiple files in one requestaddRemoveLinks: trueIf set to true, a Remove link will be added for each file previewparallelUploads: 10sets the number of parallel uploads allowed to 10paramsallows us to submit additional data with the request. Here we need to pass CSRF token. Before moving on, let’s discuss some details around sending AJAX requests in a Rails application. As you probably know, if you don’t include the CSRF token with requests sent to Rails, you will get this error in your Firebug console:ActionController::InvalidAuthenticityToken in ProductController#upload
In fact, it looks just like this:
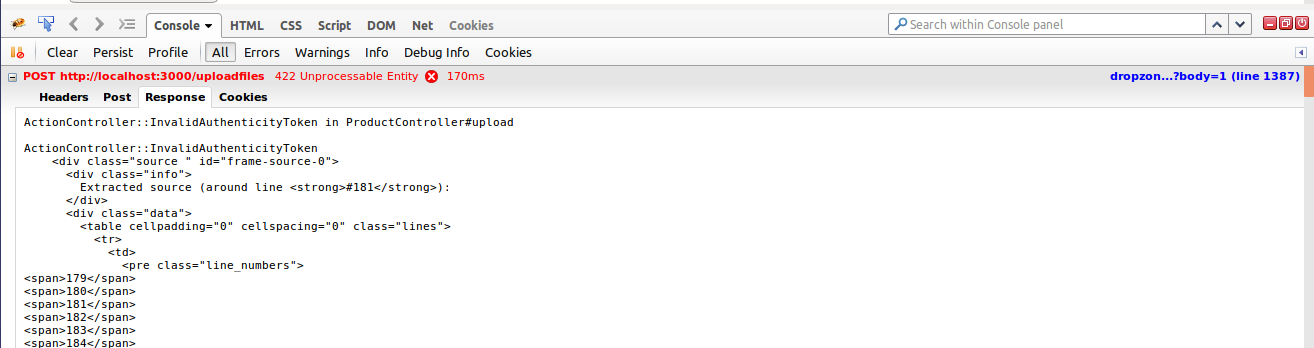
So, we pass the CSRF token here.
successmultiple: function(data,response): If the upload process is successful on the server, then we handle the data and response by this callback function. This function adds a message to ourmsgBoarddiv, fades that message out, adds the uploaded files to a hidden input in the form, then submits the form.
myDropzone.processQueue()).
$('#myForm').submit(function(e){
  if(myDropzone.getQueuedFiles().length > 0){
    e.preventDefault();
    myDropzone.processQueue();
  }
});
</script>
<% end %>
In this Rails application, we need to prevent the form submission in the first place until we make sure that all the files in the drop zone are uploaded. Once all files have been uploaded, then we can submit the form. Therefore, in the callback function for successmultiple, we let the submit event happen by off method from jQuery.
The following line submits the form if the script successfully uploads our pictures and the server sends the success message from the server:
`$('#myForm').off('submit').submit();`
Now, we need to implement the server-side of our application, which sends a success message along with the list of the uploaded files. Open up config/routes.rb and add this line:
post 'uploadfiles'=>'product#upload'
Then go to myapp/public and create a uploads directory with the following command:
mkdir uploads
This is the directory that will hold our uploaded files.
In app/controller/product_controller.rb, define the upload method as follows:
def upload
  uploaded_pics = params[:file] # Take the files which are sent by HTTP POST request.
  time_footprint = Time.now.to_i.to_formatted_s(:number) # Generate a unique number to rename the files to prevent duplication

  uploaded_pics.each do |pic|
    # these two following comments are some useful methods to debug
    # abort pic.class.inspect -> It is similar to var_dump($variable) in PHP.
    # abort pic.is_a?(Array).inspect -> With "is_a?" method, you can find the type of variable
    # abort pic[1].original_filename.inspect
    # The following snippet saves the uploaded content in '#{Rails.root}/public/uploads' with a name which contains a time footprint + the original file
    # reference: http://guides.rubyonrails.org/form_helpers.html
    File.open(Rails.root.join('public', 'uploads', pic[1].original_filename), 'wb') do |file|
      file.write(pic[1].read)
      File.rename(file, 'public/uploads/' + time_footprint + pic[1].original_filename)
    end
  end
  files_list = Dir['public/uploads/*'].to_json #get a list of all files in the {public/uploads} directory and make a JSON to pass to the server
  render json: { message: 'You have successfully uploded your images.', files_list: files_list } #return a JSON object amd success message if uploading is successful
end
On the server-side, we take the files sent through POST request with the params hash. Then, generate a unique numeric string which is about to be used for making the file names unique. By doing so, we prevent duplication.
Then, we upload and rename the files one by one. Finally, get the list of all uploaded files and return a JSON with a success message and a list of all successfully uploaded files.
OK, time to run our application and see what we have already done. Go to the myapp folder and start the server:
rails s
In the browser, go to the new product page. You should see the following form:
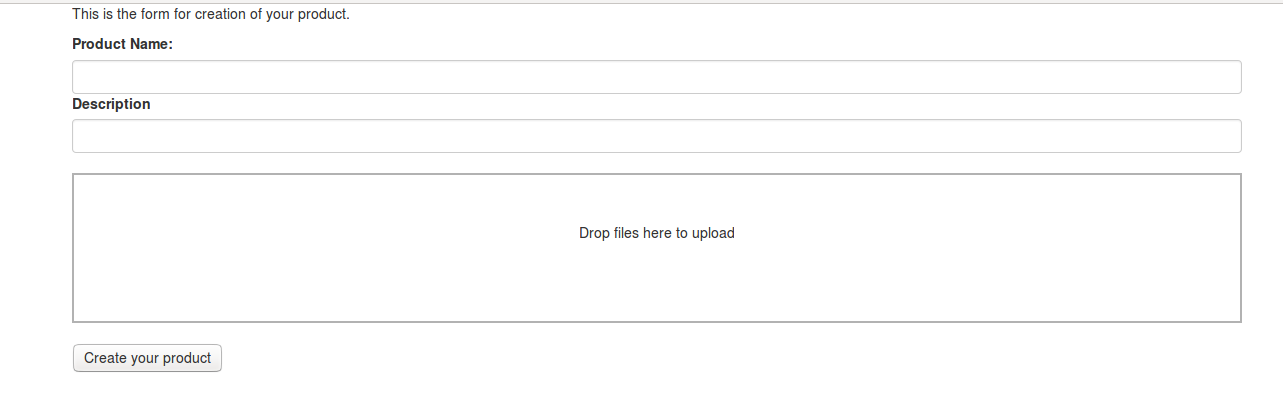
If you submit the form right now, you will upload files into the public/uploads directory. We need to create a product and associate these images to this product. Let’s create our models and their migration files.
First, create the model and the migration for our product. The product has a name and a description as well as an id. Open your terminal and enter:
rails generate model Product name:string description:text
Second, create the pic model and its migration file by entering the following command:
rails generate model Pic product_id:integer:index name:text
Go to the myapp/db/migrate folder and find the migration file for Pic model. Open it and add a foreign key with this piece of code:
add_foreign_key :pics, :products
The change function of your migration file should look like as follows:
def change
  create_table :pics do |t|
      t.integer :product_id, index: true
      t.text :name

      t.timestamps null: false
    end
  add_foreign_key :pics, :products
end
Time to setup the association between the Product and Pic models. This task is unbelievably simple in Rails applications. In the real world, we would say each product has many pictures and each picture belongs to a product. So, open your Product model and add this piece of code:
has_many :pics
Your model now looks like to:
class Product < ActiveRecord::Base
  has_many :pics
end
Because each picture belongs to a product, you need to add this line to your Pic model:
belongs_to :product
That’s it. Time to migrate with rake:
rake db:migrate
As for the final part, the application should create a product after uploading the files and associate this product to the images which are already uploaded by our drop zone. This task will be handled by create method in ProductController. Open up app/controllers/product_controller.rb.
The create method should create the product for us, make the one-to-many association, and move the uploaded file to a folder which is specifically created for the given product. The folder name is the id of the product. Also, the method should create a flash message if the operation is successful and redirect the user to the previous page:
def create
  files_list = ActiveSupport::JSON.decode(params[:files_list])
  product=Product.create(name: params[:name], description: params[:description])
  Dir.mkdir("#{Rails.root}/public/"+product.id.to_s)
  files_list.each do |pic|
    File.rename( "#{Rails.root}/"+pic, "#{Rails.root}/public/"+product.id.to_s+'/'+File.basename(pic))
    product.pics.create(name: pic)
  end
  redirect_to product_new_url, notice: "Success! Product is created."
end
The flash message will be shown on the top of creation page, so we need to make a div element which show the creation message to the user. Add the following code to your app/views/product/new.html.erb file.
<% if flash.notice %>
  <div class="alert alert-success"><P><%= flash.notice %></p></div>
<% end %>
OK, we are done with this small module for our e-commerce application. Start the rails server (rails s) and go to the new product page in the browser. If you fill out the form, drag and drop its pictures, and click the submit button, then the application will upload the pictures, create our product, and associate the uploaded images to our product.
For example, I am going to create a bike product and upload three pictures of it along with a name and a description. Here is what the new product page looks like:
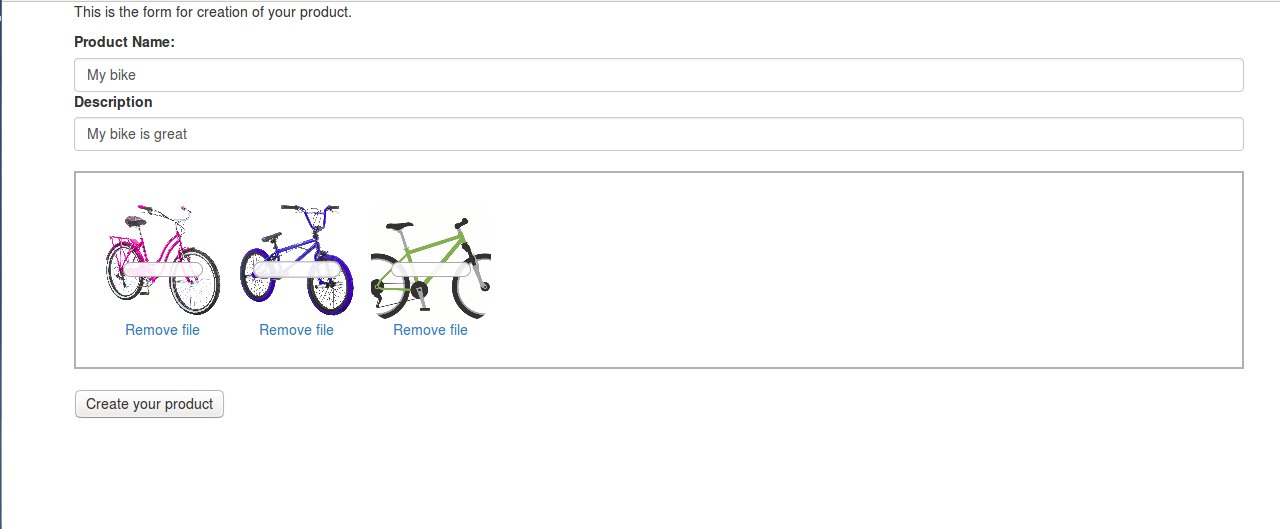
If I click the “Create your product” button, it will create the record and redirect me to the same page with a flash message as follows:

Conclusion
OK, that is all to create this small module for our online shop. Dropzone.js has allowed us to equip our Rails application with a nice user experience for uploading images without having to lean on a file-uploading gem.
I hope you found this useful.
Frequently Asked Questions (FAQs) about Asynchronous Multiple File Upload with Rails and Dropzone.js
How can I customize the appearance of the Dropzone in Rails?
Customizing the appearance of the Dropzone in Rails is quite straightforward. You can use CSS to style the Dropzone according to your preferences. The Dropzone div can be styled like any other div in your application. You can change the border, background color, text color, and more. Additionally, Dropzone.js provides several configurable options that you can use to customize the appearance and behavior of the Dropzone. For instance, you can change the default message displayed in the Dropzone, the preview template, and more.
Can I limit the number of files that can be uploaded using Dropzone.js in Rails?
Yes, you can limit the number of files that can be uploaded using Dropzone.js in Rails. This can be done by setting the ‘maxFiles’ option in the Dropzone configuration. For example, if you want to limit the number of files to 10, you can do so by setting ‘maxFiles: 10’ in the Dropzone configuration. If a user tries to upload more than the specified number of files, an error message will be displayed.
How can I handle file upload errors with Dropzone.js in Rails?
Handling file upload errors with Dropzone.js in Rails can be done by listening to the ‘error’ event. This event is fired when an error occurs during the file upload process. You can attach a callback function to this event to handle the error. The callback function will be passed two arguments: the file that caused the error and the error message. You can use this information to display an appropriate error message to the user.
Can I use Dropzone.js with Active Storage in Rails?
Yes, you can use Dropzone.js with Active Storage in Rails. Active Storage is a built-in file upload solution provided by Rails. It supports uploading files to various cloud storage services like Amazon S3, Google Cloud Storage, and Microsoft Azure Storage. You can use Dropzone.js to provide a drag-and-drop file upload interface, and Active Storage to handle the file upload process.
How can I delete uploaded files with Dropzone.js in Rails?
Deleting uploaded files with Dropzone.js in Rails can be done by sending a DELETE request to the server. You can listen to the ‘removedfile’ event, which is fired when a file is removed from the Dropzone. In the callback function for this event, you can send a DELETE request to the server with the ID of the file to be deleted. On the server side, you can handle this request by deleting the file from the storage and sending a response back to the client.
Can I upload multiple files at once with Dropzone.js in Rails?
Yes, you can upload multiple files at once with Dropzone.js in Rails. By default, Dropzone.js allows multiple file uploads. You can select multiple files in the file dialog, or drag and drop multiple files into the Dropzone. Each file will be uploaded separately, and the progress of each file upload will be displayed in the Dropzone.
How can I add additional data to the file upload request with Dropzone.js in Rails?
Adding additional data to the file upload request with Dropzone.js in Rails can be done by using the ‘sending’ event. This event is fired just before a file is sent to the server. You can attach a callback function to this event to modify the file upload request. The callback function will be passed three arguments: the file, the xhr object, and the formData object. You can use the formData object to append additional data to the file upload request.
How can I prevent duplicate file uploads with Dropzone.js in Rails?
Preventing duplicate file uploads with Dropzone.js in Rails can be done by using the ‘addedfile’ event. This event is fired when a file is added to the Dropzone. You can attach a callback function to this event to check if a file with the same name already exists in the Dropzone. If it does, you can prevent the file from being uploaded by calling the ‘removeFile’ method on the Dropzone instance.
Can I use Dropzone.js in Rails without jQuery?
Yes, you can use Dropzone.js in Rails without jQuery. Dropzone.js does not have any dependencies and does not require jQuery. You can use it with plain JavaScript. However, if you are already using jQuery in your Rails application, you can certainly use it with Dropzone.js as well.
How can I test file uploads with Dropzone.js in Rails?
Testing file uploads with Dropzone.js in Rails can be done by using a testing framework like RSpec or MiniTest. You can create a test that simulates a file upload request to the server. You can check if the file was successfully uploaded by checking the response from the server and the state of the database. Additionally, you can use a tool like Capybara to simulate user interactions with the Dropzone in a browser.
 Vahob Rasti
Vahob is a Full stack web developer with experience in PHP, Laravel, Ruby on Rails, JavaScript and bootstrap. Working as a Full stack developer for a marketing company in Sydney, Vahob is working on a wide variety of projects.


