You probably spend most of your programming time trying to make your code better or faster or more efficient, don’t you? How much time to you spend actually documenting your code, though? Not a lot, if you’re like most of us, but documentation isn’t that important, right?
Maybe, if you are working on a small project and your team consists of just one member and that’s you. But even then you won’t be there to maintain that little project of yours forever. If someday, someone walks in and tries to understand how it all works in order to implement another feature or fix a bug, it might take much much longer to just get started. Besides, we all know that lost feeling when we encounter a large, undocumented code base and try to fix a bug. “Code as documentation” doesn’t always (or ever?) work.
For APIs, this is far more important as the system you are developing is going to be used by others through endpoints you expose. Consider a scenario when you have to design a back-end solution for a business problem, which will be used by a front-end or mobile teams. It would be inconvenient to share Postman collections every time an API is changed or implemented. This will slow down the development pace and cause unnecessary friction. Thankfully, we have lots of tools available to implement documentation without having to write a lot of code and example responses.
Today I will walk you through the process of creating APIs with documentation via Swagger. Swagger has two parts: swagger-docs which generates docs for your API, and swagger-ui which uses JSON generated by swagger-docs to build a UI used to consume and interact with those APIs.
Our JSON API
We will use Rails start the project by using the --api option so that we can start with the minimum structure required for APIs:
rails new swagger-demo --api
Create a user model with name, age and status fields:
rails generate model User name age:integer status:integer
The status field will be defined as an enum:
# models/user.rb
model User < ApplicationRecord
  enum status: [:active, :inactive]
end
Create a users controller with basic CRUD actions using the scaffold_controller generator:
rails generate scaffold_controller api/v1/users
OK, our basic structure with CRUD actions is ready. Let’s add some documentation:
Setup Documentation with swagger-docs
To generate documentation we will use the swagger–docs gem. This gem will help us create JSON files which can be served to swagger-ui.
Installation
In the Gemfile:
gem 'swagger-docs'
Then,
bundle install
Configuration
Next, add an initializer called swagger_docs.rb in the config/initializers directory. Here is a basic configuration to get you started:
# config/initializers/swagger-docs.rb
Swagger::Docs::Config.register_apis({
  "1.0" => {
    # location where our api doc files will be generated, as of now we will store files under public directory
    :api_file_path => "public/",
    # base path url of our application
    # while using production mode, point it to production url
    :base_path => "http://localhost:3000",
    # setting this option true tells swagger to clean all files generated in api_file_path directory before any files are generated
    :clean_directory => true,
    # As we are using Rails-API, our ApplicationController inherits ActionController::API instead of ActionController::Base
    # Hence, we need to add ActionController::API instead of default ActionController::Base
    :base_api_controller => ActionController::API,
    # parent_controller needs to be specified if API controllers are inheriting some other controller than ApplicationController
    # :parent_controller => ApplicationController,
    :attributes => {
      :info => {
        "title" => "Swagger Demo",
        "description" => "How Swagger works",
        "contact" => "parthmodi54@yahoo.com",
        "license" => "Apache 2.0",
        "licenseUrl" => "http://www.apache.org/licenses/LICENSE-2.0.html"
      }
    }
  }
})
For more information on options available, see the swagger-docs Configuration options portion of the documentation.
Documenting the UsersController APIs
swagger-docs provides it’s own DSL for documenting APIs. The Following line registers UsersController with swagger-docs:
swagger_controller :users, "User Management"
Next, we need to add documentation for each action in the controller. We can specify required and optional parameters, types of parameters (such as string, integer, enum), and how we want those parameters (in form-data, body, or multipart form-data, etc.)
Look at the example code shown below for the create action of UsersController:
class Api::V1::UsersController < ApplicationController
  .....
  # POST /users
  swagger_api :create do
    summary "To create user"
    notes "Implementation notes, such as required params, example queries for apis are written here."
    param :form, "user[name]", :string, :required, "Name of user"
    param :form, "user[age]", :integer, :optional, "Age of user"
    param_list :form, "user[status]", :string, :required, "Status of user, can be active or inactive"
    response :success
    response :unprocessable_entity
    response :500, "Internal Error"
  end
  def create
    @user = User.new(user_params)
    if @user.save
      render json: @user, status: :created
    else
      render json: @user.errors, status: :unprocessable_entity
    end
  end
  .....
end
swagger_api is used to specify the API name and a description. param specifies a parameter name, type, and description. We use parameters that are nested in the user hash, hence we use user[name].
response lists which response codes and types that the API generates. It’s good practice to mention all possible response codes that the API may produce.
Other CRUD actions are documented in a similar manner. This might be enough for basic CRUD, but to dive deeper and know about some interesting things like DRYing up documentation, head over to the swagger-docs docs.
Generating and Viewing Documentation
The following Rake task will generate the docs for the controllers/actions that have been configured:
rake swagger:docs
This will generate documentation files at the path we specified in the API_FILE_PATH option of the initializer. If everything goes smoothly, you will see a few files generated in the public/ directory, specifically inside the public/api/v1/. If the files are not generated, run the following command to see a more verbose console output and debug what’s happening:
SD_LOG_LEVEL=1 rake swagger:docs
Note: If you are getting the error undefined method "swagger_controller" for API::V1::UsersController::Class, then you need to set the base_api_controller option explicitly as shown below:
# config/initializers/swagger-docs.rb
Swagger::Docs::Config.base_api_controller = ActionController::API
This is explained in detail here.
Great! Now we have the documentation ready. Go to the browser and type localhost:3000/api-docs.json to check out the generated JSON files. Now we can setup swagger-ui to use these docs.
Setting Up Swagger-UI
swagger-ui is a standalone structure built in HTML, CSS and, JS which provides a beautiful user interface that can be used to interact and play around with our APIs. The good part is the UI is generated dynamically with the JSON files we provide.
Installation
Follow this procedure to install swagger-uia:
Go to the swagger-ui repo and clone it or download a release.
Place the contents of the dist directory along with the index.html inside the path you specifed in the
api_file_pathoption. Based on our configuration, it is the public/ directory. This is where you will find api-docs.json. If you have changedapi_file_pathto some other location, then you will need to place files accordingly. Just keep in mind to keep both index.html and api-docs.json inside the same directory.In index.html, change the url to point to the api-docs.json file:
// get the url from search bar
var url = window.location.search.match(/url=([^&]+)/);
if (url && url.length > 1) {
  url = decodeURIComponent(url[1]);
} else {
  // point to api-docs.json to read API documentation
  url = "/api-docs.json";
}
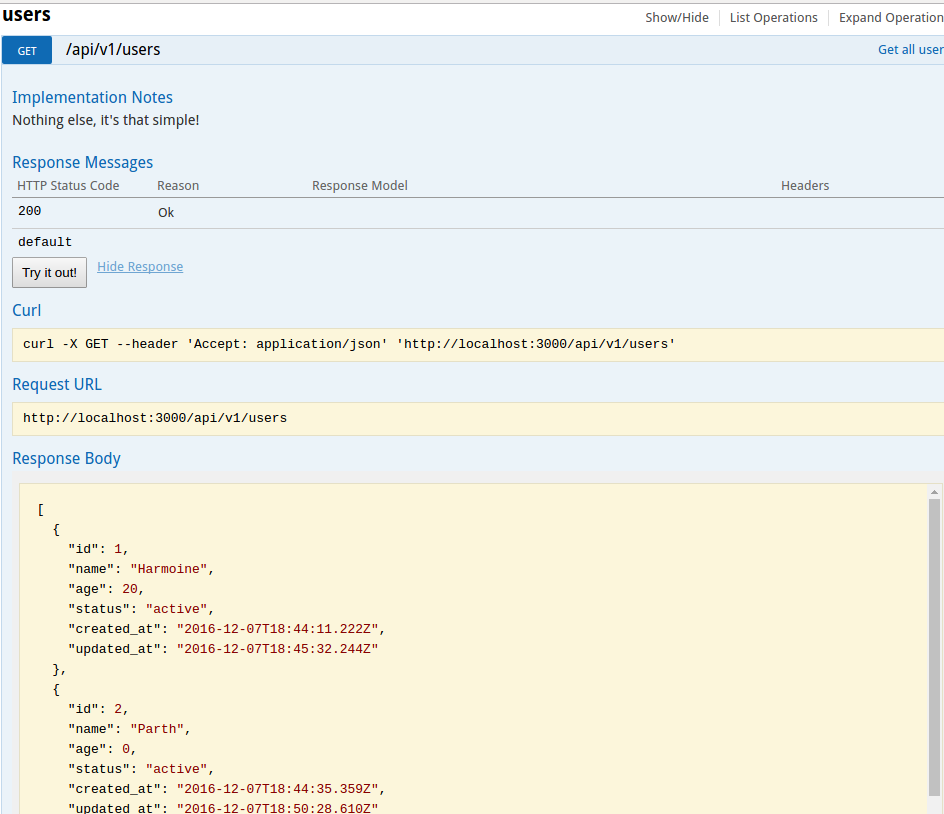
All set! Type in http://localhost:3000/index.html and see the code in action.
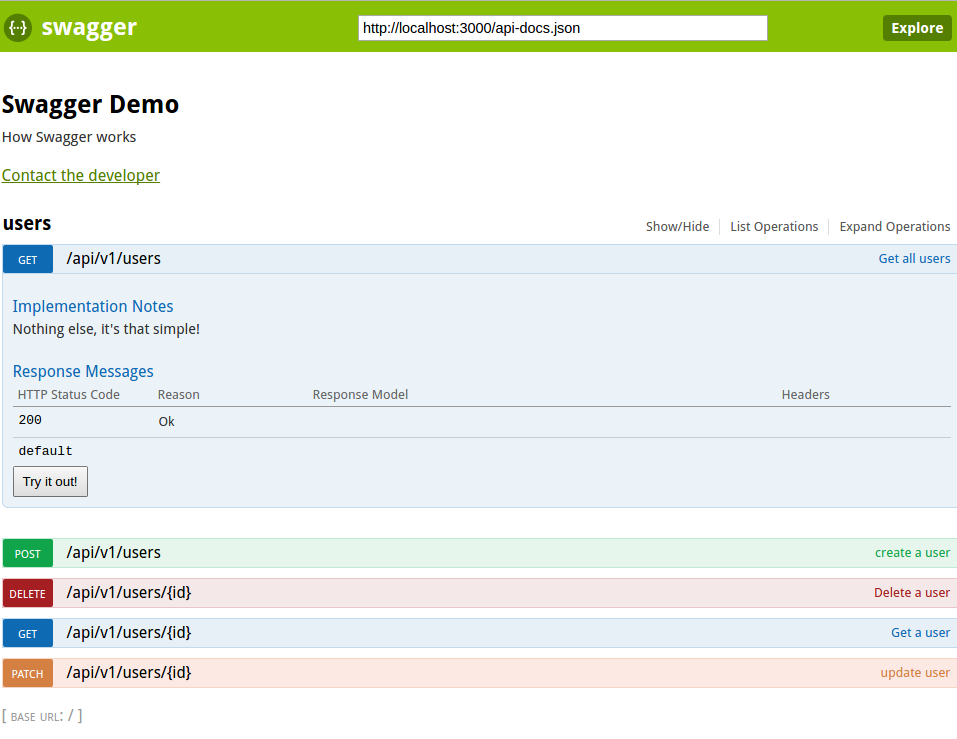
Clicking on the Try it out button will run the API action and show the result:
Here is the link to example project repository swagger-demo with all actions documented if you get stuck.
Conclusion
We implemented swagger-docs to document our APIs, using swagger-ui to build the UI dynamically from our documentation. After this initial setup, you just need to run rake swagger:docs every time you change or implement an API and swagger-ui will generate this UI for you.
Documenting your API is this manner is the right thing to do. It allows consumers to quickly understand what your API offers, allowing them to test out actions and get to writing their front end code with minimal conflict.
Frequently Asked Questions (FAQs) about Documenting Your Rails API with Swagger
How do I install and configure the Rswag gem in my Rails application?
To install the Rswag gem, you need to add it to your Gemfile. Open your Gemfile and add the following line: gem 'rswag-api' and gem 'rswag-ui'. Then, run bundle install to install the gem. After installing the gem, you need to run the Rswag install generator by typing rails g rswag:install in your terminal. This will create several files and directories in your application, including the swagger_helper.rb file, which is used to configure Rswag.
How do I write tests with Rswag?
Rswag allows you to write request specs that generate Swagger documentation. You can write these tests in the spec/requests directory. Here’s an example of a simple test:require 'swagger_helper'describe 'API V1 Posts', swagger_doc: 'v1/swagger.json' do
path '/api/v1/posts/{id}' do
get 'Retrieves a post' do
tags 'Posts'
produces 'application/json'
parameter name: :id, in: :path, type: :string
response '200', 'post found' do
schema type: :object,
properties: {
id: { type: :integer },
title: { type: :string },
content: { type: :string }
},
required: [ 'id', 'title', 'content' ]
let(:id) { Post.create(title: 'foo', content: 'bar').id }
run_test!
end
end
endend
How do I generate Swagger documentation with Rswag?
After writing your tests, you can generate the Swagger documentation by running your tests with the rspec command. This will generate a swagger.json file in the swagger/v1 directory. You can view this file in your browser by starting your Rails server and visiting http://localhost:3000/api-docs.
How do I customize the appearance of my Swagger UI?
You can customize the appearance of your Swagger UI by modifying the swagger-ui.html file in the public/api-docs directory. You can change the colors, fonts, and layout of the UI to match your application’s branding.
How do I add authentication to my Swagger UI?
You can add authentication to your Swagger UI by adding security definitions to your Swagger documentation. In your swagger_helper.rb file, you can add a security definition like this:config.swagger_docs = {
'v1/swagger.json' => {
swagger: '2.0',
info: {
title: 'API V1',
version: 'v1'
},
securityDefinitions: {
Bearer: {
type: :apiKey,
name: 'Authorization',
in: :header
}
}
}}
Then, in your request specs, you can add a security block to indicate that a route requires authentication:security [ Bearer: [] ]
How do I document request parameters with Rswag?
You can document request parameters by adding a parameter block in your request specs. Here’s an example:parameter name: :id, in: :path, type: :string
This will document a path parameter named id of type string.
How do I document response schemas with Rswag?
You can document response schemas by adding a schema block in your response block. Here’s an example:schema type: :object,
properties: {
id: { type: :integer },
title: { type: :string },
content: { type: :string }
},
required: [ 'id', 'title', 'content' ]
This will document a response object with properties id, title, and content.
How do I handle errors and exceptions in my Swagger documentation?
You can document errors and exceptions by adding additional response blocks in your request specs. For example, you can add a response '404', 'post not found' block to document a 404 error.
How do I version my API with Rswag?
You can version your API by creating separate Swagger docs for each version. In your swagger_helper.rb file, you can define multiple Swagger docs like this:config.swagger_docs = {
'v1/swagger.json' => {
swagger: '2.0',
info: {
title: 'API V1',
version: 'v1'
}
},
'v2/swagger.json' => {
swagger: '2.0',
info: {
title: 'API V2',
version: 'v2'
}
}}
Then, in your request specs, you can specify which Swagger doc to use with the swagger_doc option:describe 'API V1 Posts', swagger_doc: 'v1/swagger.json' do
# ...enddescribe 'API V2 Posts', swagger_doc: 'v2/swagger.json' do
# ...end
How do I deploy my Swagger documentation to a production environment?
You can deploy your Swagger documentation by including the public/api-docs directory in your production build. If you’re using a platform like Heroku, you can add a post-build script to your package.json file to run your tests and generate the Swagger documentation during the build process.
 Parth Modi
Loves to work in Ruby on Rails, and currently works as Software Engineer at SoluteLabs. Shares his journey of learning at his blog parthtalks and at medium.