


Traditionally, tracing mail is a difficult and time consuming process. However, recent tech innovations are changing the landscape. At Lob, most of our customers would like to keep track of their mail pieces in real time as they move through the USPS mail stream.
With Lob, you can now set up webhooks to receive real-time tracking events to show you exactly where your mail is in the delivery process. This tutorial will show you how to build a Rails web app that is ready to receive Lob's webhooks.
This tutorial will show you how to build a website to verify your personal address by sending a postcard with a unique verification code. Once you build the site and add an intake form, you can use Lob's webhooks to set up automated emails as the postcard moves through transit and delivery.
This tutorial is geared towards web developers that have at least some experience with Ruby on Rails. You don't need to be an expert, but it will help to have played around with Rails and APIs before.
Before diving into the code, we will need to register for a Lob and SendGrid API key.
Lob

Visit the registration page and sign up for an account. You will be given a Test API Key which will give you full access to the API in a sandbox environment. All of Lob's Printing APIs are free to try. When in Test mode, you can create postcards and view them in the dashboard, but nothing will actually be mailed until you use a Live API Key.
SendGrid
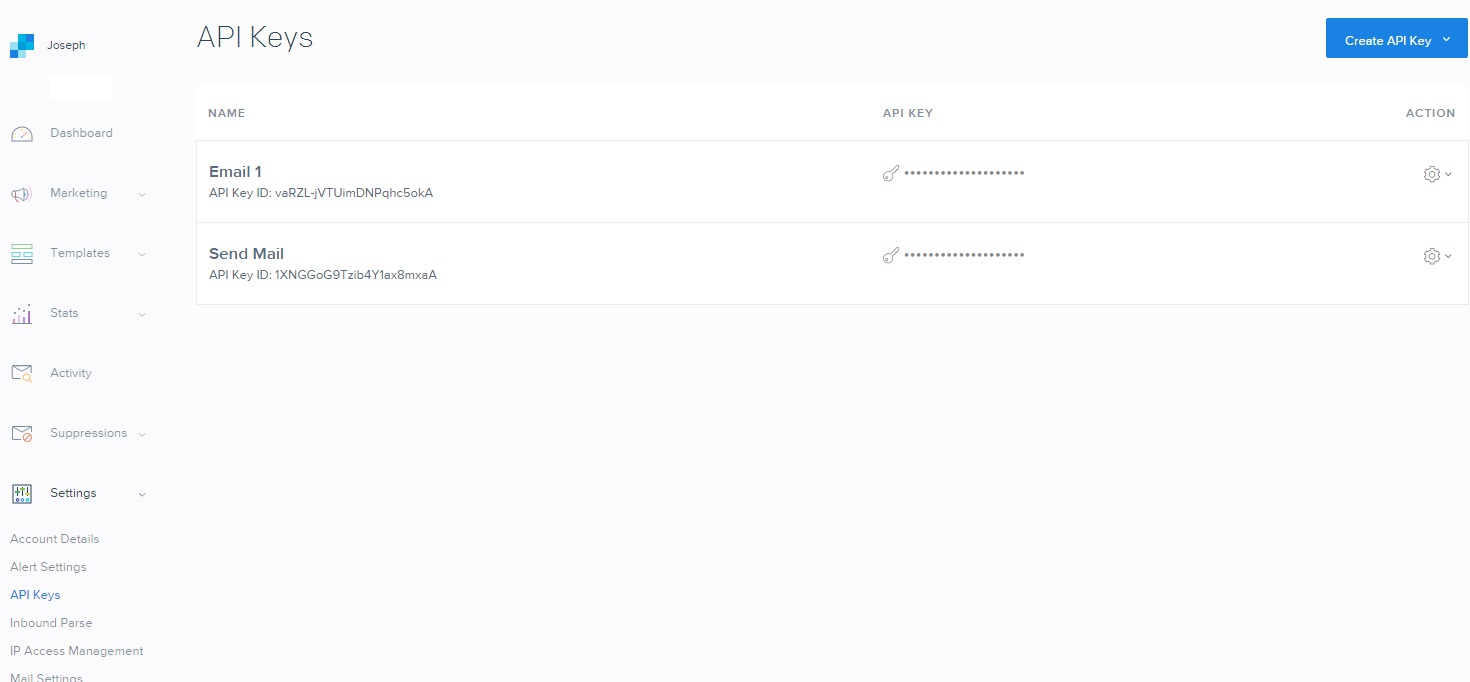
Sign up for a SendGrid account and create an API Key.
$ rails new webhooks-demo
$ cd webhooks-demo
Place all the Ruby gems we will be using to create our app in the Gemfile. The versions we will be using in this tutorial are as follows:
gem 'sendgrid-ruby', '~> 4.0.8'
gem 'lob', '~> 3.0.0'
gem 'devise', '~> 4.2.1'
gem 'sidekiq', '~> 4.2.10'
$ bundle install
We're going to be using Devise, a popular, flexible authentication solution for Rails.
$ rails generate devise:install
After this, we'll create a User table and model by utilizing another one of Devise's generators.
$ rails generate devise User
Now that we have Devise set up, we'll need to add a few fields to the User table.
verification_code - store unique verification code that will be printed on the postcard
verified - store verified state
verification_postcard_id - store the id of the postcard returned by Lob's API
first_name, last_name, ... address_country - store postcard delivery address
$ rails generate migration AddVerificationToUser
/db/migrate/xxxxx_add_verification_to_user.rb
class AddVerificationToUser < ActiveRecord::Migration[5.0]
def change
add_column :users, :verification_code, :string
add_column :users, :verified, :boolean, :default => false
add_column :users, :verification_postcard_id, :string
add_column :users, :first_name, :string
add_column :users, :last_name, :string
add_column :users, :address_line1, :string
add_column :users, :address_line2, :string
add_column :users, :address_city, :string
add_column :users, :address_state, :string
add_column :users, :address_zip, :string
add_column :users, :address_country, :string
end
end
Now we can run the migrations.
$ rake db:migrate
In the model, you will see that Devise has added in some code to handle authentication automatically. We'll use a before_create hook in the model to generate a unique code before saving the user to the database. To do this, we can use the SecureRandom library.
We'll use an after_create hook to trigger a Sidekiq worker that will receive the user_id and send the verification postcard. We'll be creating this worker later.
/models/user.rb
class User < ApplicationRecord
before_create :generate_verification_code
after_create :send_verification_postcard
devise :database_authenticatable, :registerable,
:recoverable, :rememberable, :trackable, :validatable
private
def generate_verification_code
self.verification_code = SecureRandom.hex(6)
end
def send_verification_postcard
PostcardWorker.perform_async(self.id)
end
end
We'll need to modify the registrations controller and views created by Devise to accept these relevant fields upon sign up.
$ rails generate controller registrations
/controllers/registrations_controller.rb
class RegistrationsController < Devise::RegistrationsController
private
def sign_up_params
params.require(:user).permit(:first_name, :last_name, :address_line1, :address_line2, :address_city, :address_state,
:address_zip, :address_country, :email, :password, :password_confirmation)
end
def account_update_params
params.require(:user).permit(:first_name, :last_name, :address_line1, :address_line2, :address_city, :address_state,
:address_zip, :address_country, :email, :password, :password_confirmation, :current_password)
end
end
/views/devise/registrations/new.html.erb
<div class="field"></div>
<%= f.label="" :first_name="" %=""><br></%=>
<%= f.text_field="" :first_name="" %=""></%=>
<div class="field"></div>
<%= f.label="" :last_name="" %=""><br></%=>
<%= f.text_field="" :last_name="" %=""></%=>
<div class="field"></div>
<%= f.label="" :address_line1="" %=""><br></%=>
<%= f.text_field="" :address_line1="" %=""></%=>
<div class="field"></div>
<%= f.label="" :address_line2="" %=""><br></%=>
<%= f.text_field="" :address_line2="" %=""></%=>
<div class="field"></div>
<%= f.label="" :address_city="" %=""><br></%=>
<%= f.text_field="" :address_city="" %=""></%=>
<div class="field"></div>
<%= f.label="" :address_state="" %=""><br></%=>
<%= 4="" f.text_field="" :address_state,="" maxlength:="" 2,="" size:="" %=""></%=>
<div class="field"></div>
<%= f.label="" :address_zip="" %=""><br></%=>
<%= 15="" f.text_field="" :address_zip,="" maxlength:="" 11,="" size:="" %=""></%=>
<div class="field"></div>
<%= f.label="" :address_country="" %=""><br></%=>
<%= 4="" f.text_field="" :address_country,="" maxlength:="" 2,="" size:="" %=""></%=>
Next, we'll need to create the Sidekiq PostcardWorker we called in the User model earlier.
$ rails generate sidekiq:worker Postcard
In our worker, we're going to initialize the Lob client and lookup the user_id passed in, so we can determine the verification code we need to print on the postcard. We're going to use the postcard template found in the templates gallery. We'll pass in the first_name and verification_code as data parameters.
Once we successfully complete the request, we'll store the postcard_id Lob returns so that we can associate which user should be receiving the tracking notifications.
/workers/postcard_worker.rb
class PostcardWorker
include Sidekiq::Worker
def perform(user_id)
lob = Lob::Client.new(api_key: ENV['LOB_API_KEY'])
user = User.find(user_id)
postcard = lob.postcards.create({
description: "Verification Postcard - #{user.id}",
to: {
name: user.first_name + " " + user.last_name,
address_line1: user.address_line1,
address_line2: user.address_line2,
address_city: user.address_city,
address_state: user.address_state,
address_country: user.address_country,
address_zip: user.address_zip
},
from: {
name: "Larry Lobster",
address_line1: "185 Berry St, Suite 6600",
address_city: "San Francisco",
address_state: "CA",
address_country: "US",
address_zip: "94110"
},
front: %Q(
<html></html>
<head></head>
<meta charset="UTF-8">
<link href="https://fonts.googleapis.com/css?family=Source+Sans+Pro:700" rel="stylesheet" type="text/css">
<title>Lob.com Address Verification 4x6 Postcard Template Front</title>
<style></style>
*, *:before, *:after {
-webkit-box-sizing: border-box;
-moz-box-sizing: border-box;
box-sizing: border-box;
}
body {
width: 6.25in;
height: 4.25in;
margin: 0;
padding: 0;
/* your background image should have dimensions of 1875x1275 pixels. */
background-image: url('https://s3-us-west-2.amazonaws.com/lob-assets/homelove-pc-bg.jpg');
background-size: 6.25in 4.25in;
background-repeat: no-repeat;
}
/* do not put text outside of the safe area */
#safe-area {
position: absolute;
width: 5.875in;
height: 3.875in;
left: 0.1875in;
top: 0.1875in;
text-align: center;
}
#logo {
height: 1in;
position: relative;
top: .9in;
}
#tagline {
position: relative;
top: 1in;
font-family: 'Source Sans Pro';
font-weight: 700;
font-size: .16in;
text-transform: uppercase;
letter-spacing: .03in;
color: white;
border-top: 1px solid white;
padding-top: .15in;
width: 4in;
margin: auto;
}
<body></body>
<!-- do not put text outside of the safe area -->
<div id="safe-area"></div>
<!-- your logo here! -->
<img src="https://s3-us-west-2.amazonaws.com/lob-assets/homelove-logo.png" id="logo">
<div id="tagline"></div>
Get verified and start selling!
),
back: %Q(
<html></html>
<head></head>
<meta charset="UTF-8">
<link href="https://fonts.googleapis.com/css?family=Source+Sans+Pro:400,700" rel="stylesheet" type="text/css">
<title>Lob.com Address Verification 4x6 Postcard Template Back</title>
<style></style>
*, *:before, *:after {
-webkit-box-sizing: border-box;
-moz-box-sizing: border-box;
box-sizing: border-box;
}
body {
width: 6.25in;
height: 4.25in;
margin: 0;
padding: 0;
background-color: white;
}
#banner {
height: 1in;
background-color: #9b2a62;
font-family: 'Source Sans Pro';
font-weight: 700;
font-size: .16in;
text-transform: uppercase;
letter-spacing: .03in;
color: white;
text-align: center;
padding-top: .5in;
}
/* do not put text outside of the safe area */
#safe-area {
position: absolute;
width: 5.875in;
height: 3.875in;
left: 0.1875in;
top: 0.1875in;
}
#message {
position: absolute;
width: 2.2in;
height: 2in;
top: 1.1in;
left: .25in;
font-family: 'Source Sans Pro';
font-weight: 400;
font-size: .13in;
}
#code-banner {
text-align: center;
font-size: .13in;
}
#code {
font-family: 'Source Sans Pro';
font-weight: 700;
font-size: .13in;
text-transform: uppercase;
letter-spacing: .02in;
color: #9b2a62;
border: 2px solid #9b2a62;
width: 2in;
padding: .1in;
margin: .1in auto;
}
.accent {
color: #9b2a62;
}
<body></body>
<div id="banner"></div>
{{first_name}} - Verify Your Address
<!-- do not put text outside of the safe area -->
<div id="safe-area"></div>
<div id="message"></div>
<span class="accent">{{first_name}},</span>
<br><br>
This postcard serves as verification of your address.
<br><br>
<div id="code-banner"></div>
Visit <span class="accent">https://www.acme.com/verify</span> and enter:
<div id="code"></div>
{{verification_code}}
<br>
),
data: {
first_name: user.first_name,
verification_code: user.verification_code
},
metadata: {
user_id: user.id
}
)
user.update(verification_postcard_id: postcard['id'])
end
end
Let's add a home page and some quick routing logic so we can see a preview of what we have so far. Running the command below, we'll have a empty controller and view generated for us.
$ rails generate controller home index
We're going to mount Sidekiq's web interface at /sidekiq and add some authentication logic. If a user is authenticated, they'll be able to see the home page. If not, they'll be directed to the registration form.
/config/routes.rb
require 'sidekiq/web'
Rails.application.routes.draw do
mount Sidekiq::Web => '/sidekiq'
devise_for :users, :controllers => { registrations: 'registrations' }
devise_scope :user do
authenticated :user do
root :to => 'home#index', as: :authenticated_root
end
unauthenticated :user do
root :to => 'devise/registrations#new', as: :unauthenticated_root
end
end
end
Now if we start up Rails and Sidekiq...
$ rails s
$ bundle exec sidekiq
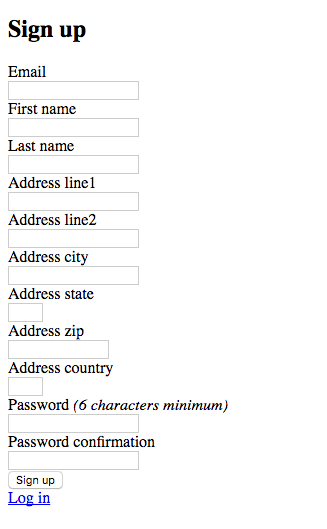
We should get something like the image below. Signing up will now generate a user and trigger a postcard with a verification code.
Now we want to receive Webhooks that Lob sends us, so we'll create a controller and Sidekiq worker to manage this. If you are writing this application in a development environment, we highly recommend using ngrok to test your webhooks. This way, you don't have to continuously deploy your application to view any changes that you make.
$ rails generate sidekiq:worker Tracking
$ rails generate controller webhooks receive
Let's add 2 additional routes, one to accept webhooks, /lob/webhooks and the other /verify to build a form to verify the unique code. We'll set up the latter in a bit.
/config/routes.rb
post '/lob/webhooks' => 'webhooks#receive'
post '/verify' => 'home#verify'
Now let's setup Webhooks in Lob's dashboard. We'll want to input the URL (whether it's a deployed URL or one generated from ngrok) and select all of the postcard tracking events (postcard.in_transit, postcard.in_local_area, postcard.processed_for_delivery, postcard.re-routed, and postcard.returned_to_sender).

We'll read in the request body and parse the JSON returned by Lob. We'll call the Sidekiq Worker, TrackingWorker, to send the actual email.
/controllers/webhooks_controller.rb
class WebhooksController < ApplicationController
skip_before_action :verify_authenticity_token
def receive
raw = request.body.read
data = JSON.parse(raw)
last_tracking_event = data['body']['tracking_events'][-1]
postcard_id = data['body']['id']
TrackingWorker.perform_async(postcard_id, last_tracking_event['name'], last_tracking_event['location'], last_tracking_event['time'])
render status: 200, json: {}.to_json
end
end
In the worker, we perform a user lookup so that we to whom we are sending the email. Then we trigger a call to SendGrid with the information provided in the webhook.
/workers/tracking_worker.rb
require 'sendgrid-ruby'
class TrackingWorker
include Sidekiq::Worker
def perform(postcard_id, event_name, event_location, event_time)
sg = SendGrid::API.new(api_key: ENV['SENDGRID_API_KEY'])
user = User.where(verification_postcard_id: postcard_id).first
from = Email.new(email: 'test@acme.com')
subject = 'Lob Webhooks Demo - Notification'
to = Email.new(email: user.email)
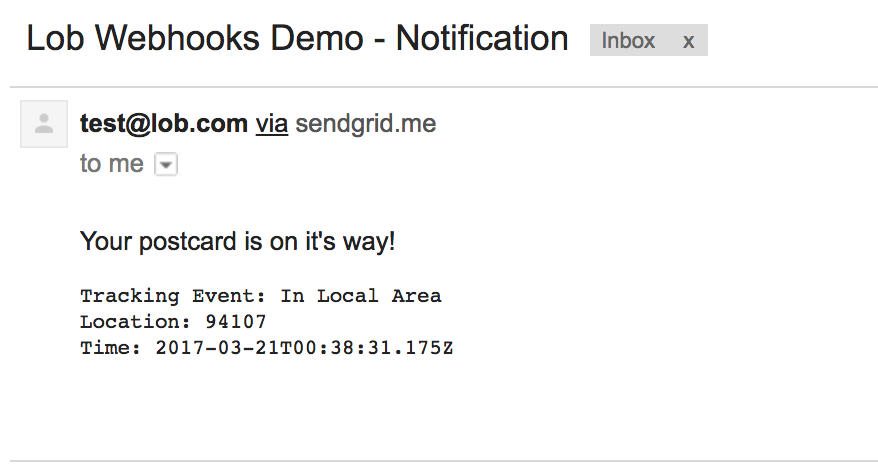
email_content = "Your postcard is on it's way! \n\n Tracking Event: #{event_name} \n Location: #{event_location} \n Time: #{event_time}"
content = Content.new(type: 'text/plain', value: email_content)
mail = Mail.new(from, subject, to, content)
sg.client.mail._('send').post(request_body: mail.to_json)
end
end
Now we just need to verify that this is the correct verification code! Let's go back to the HomeController we created earlier. We'll add some simple logic to determine if the verification code entered is the same as the one we generated for the user.
/controllers/home_controller.rb
class HomeController < ApplicationController
def index
end
def verify
if params['verification_code'].eql? current_user.verification_code
current_user.update(verified: true)
redirect_to '/', alert: "You are verified!"
else
redirect_to '/', alert: "That is not your verification code!"
end
end
end
And a really simple view.
/views/home/index.html.erb
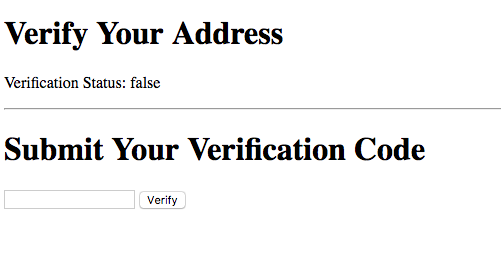
<h1>Verify Your Address</h1>
<p>Verification Status: <%= current_user.verified="" %=""></%=></p>
<hr>
<% if="" !current_user.verified?="" %=""></%>
<h1>Submit Your Verification Code</h1>
<%= form_tag("="" verify",="" method:="" "post")="" do="" %=""></%=>
<%= text_field_tag("verification_code",="" nil,="" required:="" true)="" %=""></%=>
<%= submit_tag("verify")="" %=""></%=>
<% end="" %=""></%>
<% end="" %=""></%>
Now you have a fully functional address verification system using Lob's postcard and webhook functionality!
You can check out Lob's documentation and webhooks guide for more information. If you have any additional questions, don't hesitate to leave a comment below or contact us directly. We're always happy to help!
.png)
.png)
.png)