How to write an MVC framework in Ruby

Hey guys! What if we wrote a web application similar to a typical rails-application? I.e. it will have MVC, routing, migrations, some configs, all in all, everything like it's supposed to be (or purposed, whatever you like). But all this will be a very-very simplified version of our favorite framework. There will be no generators and interactive console, beautiful layouts and messing with assets. In short, let's go!
Rack
Let's begin by creating an empty folder named blog, in which we will work.
$ mkdir blog
$ cd blog
$ bundle init
Let's write into the gem file:
# Gemfile
source "https://rubygems.org"
ruby '2.3.1'
gem 'rack'
So, I've connected a gem repository, specified the ruby version, and now I will need gem 'rack'. Rack provides a minimalistic interface between web applications. This way one web application can be built into another, another application built into one more application.
Offtop 1. A little bit of Rack background
Rack will soon turn 10 years. Way back then every framework developer had to write his own web-server engine, hoping that users will get used to the author's choice.
Though, work with HTTP is pretty simple. All in all, you receive a request and send back a response. The most common case of engine works like this: it receives CGI-like request and sends back in a response 3 values: http status code, a list of http-headers and a response body.
Here is an example of a typical rack-application:
app = Proc.new do |env|
     ['200', {'Content-Type' => 'text/html'}, ['A barebones rack app.']]
end
Proc can respond when the call method is called, and in this case it will return a string with http status code, a hash with http-headers and an array with content.
Libraries for typical tasks support are built on top of this minimal API. Among these tasks are: parsing a request, working with cookies, easy work with Rack::Request and Rack:Response on the object, not http-protocol level.
This way Rack becomes a small layer between a web-server and our actual application.
- Rails uses rack in actionpack – this is a gem in rails which is responsible for handling requests and responses.
- Sinatra, known publicly as a mini DSL for writing route-driven applications, uses rack (see gemspec)
- Hanami uses rack in hanami-router, a gem which is responsible for routing.
- Grape, a rest-like framework for creating API, uses rack (see gemspec).
- Goliaph, an asynchronous web-framework, uses rack (see gemspec)
If I didn't mention your favorite framework, look for yourself. It is very likely that it uses Rack, too.
Rack. Let's go on
Okay. Let's write our own rack-application then:
# app.rb
class App
  def call(env)
    [200, {}, ['Hello world']]
  end
end
It meets all the requirements of a rack-application. Now we need to create config.ru file, which, in fact, will run our application.
#config.ru
require 'rubygems'
require 'bundler'
Bundler.require

require "./app"

run App.new
Nothing special here. Connecting rubygems, connecting bundler, then Bundler.require scans our Gemfile and connects everything in here. Then we connect our application which lays here in the root folder, and then we run it using the command run App.new.
That's all! The application is done. Let's run and check it out.
$ bundle install
$ rackup
Our application has started and we can take a look on it on http://localhost:9292.
Okay, very quickly, one addition. Let's use puma instead of webrick as an application server. For that to happen let's add gem 'puma' to Gemfile and execute $ bundle install. Now after restarting the application rackup will use puma.
(Vanya, WTF?! Why puma? – editor's note)
The answer: in my view of life, puma starts and works faster than webrick. During the development it doesn't matter at all that webrick is single-threaded and puma can do better. Much more important thing is that webrick is only suitable for development, and puma is suitable both for development and publishing. That means you don't have to keep in mind that you should change a web server. That's it!
Router
We have made a simple application. It always sends a response with one and the same status, one and the same "helloworld". Let's go on. We need to receive different web pages by different URLs. In Rails it can be solved with the help of routings. It is routings where we associate url with a handler. We will use something similar to this. Also, two innovations: let's put everything concerning our "framework" into the lib folder, everything concerning the end application – in app folder.
At first let's create something like route config, and I have written it in yaml.
#./app/routes.yml
"/" : "main#index"
"/hello": "main#hello"
"/posts": "posts#index"
A very simple association. The root url leads to MainController index action. We need to connect this config in our application, and I will do it this way.
# app.rb
require 'yaml'
ROUTES = YAML.load(File.read(File.join(File.dirname(__FILE__), "app", "routes.yml"))) # 1

require "./lib/router" # 2

class App
  attr_reader :router

  def initialize
    @router = Router.new(ROUTES) # 3
  end

  def call(env)
    result = router.resolve(env) # 4
    [result.status, result.headers, result.content] # 5
  end
end
What I have done here, step by step:
- I have created a constant ROUTES, in which I save a key-value hash from our routes.yml file.
- I have connected a router class (we don't have it yet, but that doesn't mean that we can't think of it)
- The router is created during the initialization of our app, it receives our routing hash and is saved into an instance-variable
- At the moment when the call method is called, there is already all information about the request, including the url, in the environment. That's why we pass this information to our router so that it would decide what to do with it.
- And, finally, we need to meet the requirements of a Rack-interface, so we return the status, the headers and the content.
All that's left is write the router class itself. And that's how it will look like:
# ./lib/router.rb
class Router
  attr_reader :routes

  def initialize(routes)
    @routes = routes # 1
  end

  def resolve(env)
    path = env['REQUEST_PATH'] # 2
    if routes.key?(path) # 3
      ctrl(routes[path]).call # 4
    else
      Controller.new.not_found # 5
    end
  rescue Exception => error
    puts error.message
    puts error.backtrace
    Controller.new.internal_error # 6
  end

  private def ctrl(string)
    ctrl_name, action_name = string.split('#')
    klass = Object.const_get "#{ctrl_name.capitalize}Controller"
    klass.new(name: ctrl_name, action: action_name.to_sym)
  end
end
And here it's pretty simple.
- So, we've saved our routing hash
- Getting a path from a request
- If we have some value associated with this path,
- than we will handle it as intended (I will explain further)
- If there is no such path, we will return the status 404 (Not Found)
- And if some kind of trouble had occurred, we will print all the information to the console and return the status 500 (Internal Server Error)
So, what is happening in point 4?
This: we look in our routes for a value associated with the url. Let's assume that this is a root request, in our routes.yml we wrote "/" : "main#index". Therefore, as a result we get "main#index".
From this string we have to get a controller, but how? It's done in a method def ctrl(string).
- Split the string
stringby the # char. We get two values: the name of the controller and the name of the action("main"and"index"). - Routings are written by the user of our so called framework, so as the controllers. That's why we make up the name of the controller (
MainController) from the string - initializing it (
MainController.new(name: "main", action: :index)) - and call this controller in a method resolve.
That's how quick we have gotten to the controllers. Let's go on?
Enroll
Want to learn more?
Enroll for a mentorship to the author!
Offtop 2. The first controller
Oh! Now we can create our first controller
# app/controllers/main_controller.rb
class MainController < Controller
  def index
    @test = "Some dump text here"
    @arr = %w(one two three)
  end
end
We don't know how the user of our simple library will call controllers. His controllers will inherit ours, but still we need to connect them to our application. For that purpose let's add the following line to app.rb. Let's do the same thing for the lib folder as well, so that we won't have to specify what to connect:
# app.rb
Dir[File.join(File.dirname(__FILE__), 'lib', '*.rb')].each {|file| require file }
Dir[File.join(File.dirname(__FILE__), 'app', '**', '*.rb')].each {|file| require file }
...
Controller
So, what do we need from controllers? Any self-respecting controller should be able to respond to call method, know its name and action to be called with.
Speaking about routings, I forgot to mention the following: as we see from the code, a controller object will be returned to result.
  def call(env)
    result = router.resolve(env)
    [result.status, result.headers, result.content]
  end
Remember? Right here a router resolved our request and it will return a whole controller to result. And then we will request the status, the headers and the content from it. OK, let's go!
# ./lib/controller.rb
class Controller
  attr_reader :name, :action
  attr_accessor :status, :headers, :content

  def initialize(name: nil, action: nil)
    @name = name
    @action = action # 1
  end

  def call
    send(action) # 2
    self.status = 200 # 3
    self.headers = {"Content-Type" => "text/html"}
    self.content = ["Hello world"]
    self
  end

  def not_found # 4
    self.status = 404
    self.headers = {}
    self.content = ["Nothing found"]
    self
  end

  def internal_error # 5
    self.status = 500
    self.headers = {}
    self.content = ["Internal error"]
    self
  end
end
Just a pure prose and no romance:
- Saving the action to be called
- Calling the action
- Only from desire to simplify and get a working version, I say that all the successful calls will have the status 200, the headers in HTML, and an annoying "Hello world" in the body.
- I have made a separate method for not found. It is the controller, not the content that we should return, that's why there is
selfin the end - The same story with 500.
After all of these manipulations, having run the application and visited an empty url, we should see Hello world. Everything works!
Views
Let's brush up our controller a little. I chose Slim as a template engine. It is easy to add it to our framework:
# GEmfile
...
gem 'slim'
$ bundle install
Then let's change our content in the controller:
# ./lib/controller.rb
  ...
  def call
    send(action) # 1
    self.status = 200
    self.headers = {"Content-Type" => "text/html"}
    self.content = [template.render(self)] # 2
    self
  end

  def template # 3
    Slim::Template.new(File.join(App.root, 'app', 'views', "#{self.name}", "#{self.action}.slim"))
  end
  ...
Explanations:
- Our custom controller (MainController) will define several new instance-variables, when a method call will be called, and, thus, a method index will be run. Following our example, new variables –
@testand@arrwill appear. - Exactly for this purpose we pass a controller instance to our template engine. Thus, variables defined in a controller will be accessible from a template.
- In this method we create the template object itself, pull our view for this controller and this action (
app/views/main/index.slim)
Everything is pretty simple. The last thing that's left to do is add the root method to our application.
# app.rb
...
class App
...
  def self.root
    File.dirname(__FILE__)
  end
end
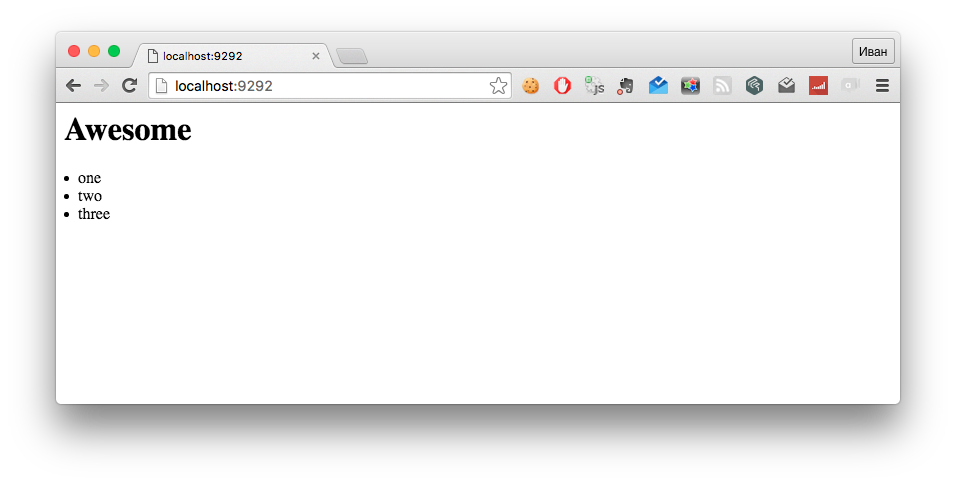
Done! Now we can register our routes, make light controllers and draw views. And the first view will look like this:
h1 = @test
- @arr.each do |elem|
  li = elem
As a result, after running our application we will see:
Model
Hey, are you still here? What, you are interested in models, too?
Ok, but no ActiveRecord, mind you. We will use an excellent gem, which can do the same and even a little more sequel and db sqlite itself.
# Gemfile
...
gem 'sequel'
gem 'sqlite3'
The greatest thing about it is that we won't have to create our model for other models to inherit it. And that's why let's discuss it through the example of posts model. In our routes file there is already a record about "/posts" => "posts#index". So, now let's create a controller, a model and a view.
# ./app/models/post.rb
class Post < Sequel::Model(DB)
end
The typical model in a rails-application (only it inherits Sequel::Model).
# ./app/controllers/posts_controller.rb
class PostsController < Controller
  def index
    @posts = Post.all
  end
end
A typical rails controller, without a doubt.
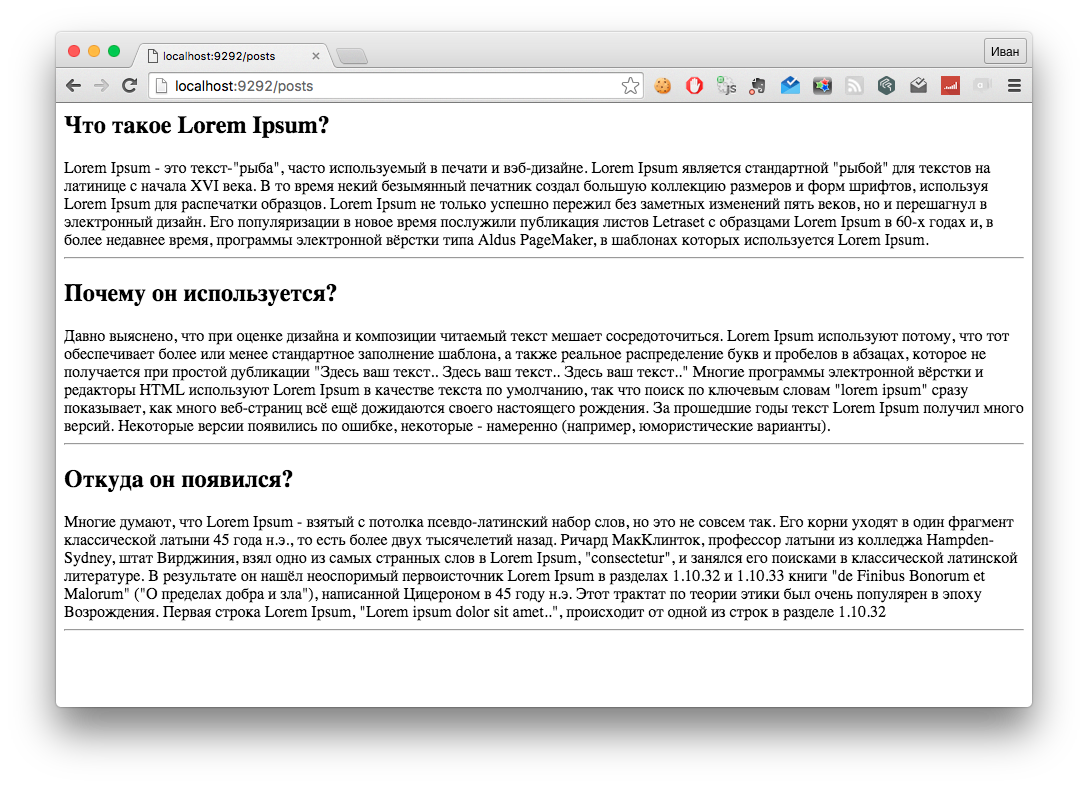
/ ./app/views/posts/index.slim
- @posts.each do |post|
  h2 = post.title
  div = post.content
  hr
And a very simple view. What else do we need, actually?
This: An attentive reader has already saw that our model inherits Sequel::Model(DB). And the constant DB, in its order, isn't defined anywhere. That's what our application will say after an attempt to run it. Moreover, what kind of framework is this, if we haven't defined database access configs anywhere? That's what we will start with:
# app.rb
db_config_file = File.join(File.dirname(__FILE__), "app", "database.yml")
if File.exist?(db_config_file)
  config = YAML.load(File.read(db_config_file))
  DB = Sequel.connect(config)
end
...
Again, I have added a little piece of code to app.rb. The first line checks whether there is a config file. If there is, we read this file, parse it, creating a connection to the database and saving it to the DB constant. That's how config file will look like in our case:
# ./app/database.yml
adapter: sqlite
database: "./app/db/dev.sqlite3"
It makes sense that we need this db file to exist. Let's execute several commands.
$ mkdir -p app/db
$ touch app/db/dev.sqlite3
Learn more
The author of this article teaches
the basics of Ruby on Rails
Migrations
Just a few things left. We already have posts, but we have neither the table, nor the posts themselves. The solution is not that complicated. Migrations will start automatically when the application is run. For that purpose we will need an extension for Sequel. Let's add it in one line to the block where a connection to the database is defined.
# Creating database context
db_config_file = File.join(File.dirname(__FILE__), 'app', 'database.yml')
if File.exist?(db_config_file)
  config = YAML.load(File.read(db_config_file))
  DB = Sequel.connect(config)
  Sequel.extension :migration
end

# Connecting all our framework's classes
Dir[File.join(File.dirname(__FILE__), 'lib', '*.rb')].each {|file| require file }

# Connecting all our framework's files
Dir[File.join(File.dirname(__FILE__), 'app', '**', '*.rb')].each {|file| require file }

# If there is a database connection, running all the migrations
if DB
  Sequel::Migrator.run(DB, File.join(File.dirname(__FILE__), 'app', 'db', 'migrations'))
end
The conencted files execution order is worth paying attention to. First we check if there is a database and connect to it, because it is important for our models that DB-connect is defined.
After that we read our framework, or else application controllers won't find what to address to. Then we scan the app folder. Now both controllers and database are defined.
And after all that we just execute the migrator command run. We define that our migrations will be in app/db/migrations/ folder.
And, finally, let's write two migrations. The first will create a post table, the second will create several posts.
# ./app/db/migrations/001_create_table_posts.rb
class CreateTablePosts < Sequel::Migration
  def up
    create_table :posts do
      primary_key :id
      column :title, :text
      String :content
      index :title
    end
  end

  def down
    drop_table :posts
  end
end

# ./app/db/migrations/002_add_some_posts.rb
class AddSomePosts < Sequel::Migration
  def up
    Post.create(
      title: 'What is Lorem Ipsum?',
      content: 'Lorem Ipsum is a dummy text...'
    )
    Post.create(
      title: 'Why do we use it?',
      content: 'It is a long established fact that a reader...'
    )
    Post.create(
      title: 'Where does it come from?',
      content: 'Contrary to popular belief, Lorem Ipsum is not simply...'
    )
  end

  def down
  end
end
Let's run our application and here's what we get:
Offtop 3. Polishing
Actually, all this connection has grown well and I decided to put it into a separate file lib/boot.rb
# ./lib/boot.rb
# Creating database context
db_config_file = File.join(File.dirname(__FILE__), '..', 'app', 'database.yml')
if File.exist?(db_config_file)
  config = YAML.load(File.read(db_config_file))
  DB = Sequel.connect(config)
  Sequel.extension :migration
end

# Connecting all our framework's classes
Dir[File.join(File.dirname(__FILE__), '..', 'lib', '*.rb')].each {|file| require file }

# Connecting all our framework's files
Dir[File.join(File.dirname(__FILE__), '..', 'app', '**', '*.rb')].each {|file| require file }

# If there is a database connection, running all the migrations
if DB
  Sequel::Migrator.run(DB, File.join(File.dirname(__FILE__), '..', 'app', 'db', 'migrations'))
end

# Reading routings
ROUTES = YAML.load(File.read(File.join(File.dirname(__FILE__), '..', 'app', 'routes.yml')))
Pay attention that we added '..' to all of the paths, that's because boot.rb itself is located in lib, and all the paths were written relative to the root.
That's all folks!
Yes, that's all. As you see, it's not that difficult to write such an application. And such exercises give an understanding of how all this works.
I can't let you go without a home assignment. Try to implement something from this list:
- To tell the truth – this is the task from one of my interviews. So, an interviewer trolled me after every written method: "Maybe we should write a test?", "And if we were real programmers, would we test this?", "Let's imagine that our application works. Do we need tests?". So the First task is to test our code.
- We have very poor routings – we handle all the requests as GET. It will be interesting to look at the implementation of a full RESTful application
- We could use layout support
- A public folder could give assets without creating a controller
- How about implementing an interactive console like the
rails cone? It would be great to interact with models through it. - Generators! Migrations, models, controllers, views – we like to generate these files from rails-hood.
- And a task for a super-programmer: put all this into a separate gem, so that we can generate an application in one command and start filling the
appfolder.
I attach the link to the repository with the end version. Presto!
Go for it!