Quickstart
Zero to API in 5 minutes
This quickstart will use Rails with ActiveRecord to give an overview of Graphiti functionality on familiar ground. For a more in-depth breakdown, head to the Guides.
If the below seems too “magical”, don’t worry - we’re just applying some sensible defaults to get started quickly.
Installation
Let’s start with a classic Rails blog. We’ll use a template to handle some of the boilerplate. Just run this command and accept all the defaults for now:
$ rails new blog --api -m https://www.graphiti.dev/templateFeel free to run git diff if you’re interested in the
particulars; this is mostly just installing gems and including modules.
Note: if a network issue prevents you from pointing to this URL directly, you can download the file and and run this command as
-m
/path/to/template
Alternatively, you can add to an existing project.
Defining a Resource
A Resource defines how to query and persist your Model. In other words: a Model is to the database as Resource is to the API. So first, let’s define our Model:
$ bundle exec rails generate model Post title:string upvotes:integer active:boolean
$ bundle exec rails db:migrate
Now we can use the built-in generator to define our Resource, corresponding Endpoint, and Integration Tests.
$ bundle exec rails g graphiti:resource Post title:string upvotes:integer active:booleanYou’ll see a number of files created. Now run your app!:
$ bundle exec rails sVerify http://localhost:3000/api/v1/posts renders JSON correctly.
Now we just need data.
Seeding Data
Edit db/seeds.rb to create a few Posts:
Post.create!(title: 'My title', upvotes: 10, active: true)
Post.create!(title: 'Another title', upvotes: 20, active: false)
Post.create!(title: 'OMG! A title', upvotes: 30, active: true)
And run the script:
$ bundle exec rails db:seedNow load http://localhost:3000/api/v1/posts. You should have 3 Posts in
your database!
Querying
Now that we’ve defined our Resource and seeded some data, let’s see
what query functionality we have. We’ve listed all Posts at
http://localhost:3000/api/v1/posts. Let’s see what we can do:
- Sort
- By title, ascending:
- URL:
/api/v1/posts?sort=title - SQL:
SELECT * FROM posts ORDER BY title ASC
- URL:
- By title, descending:
- URL:
/api/v1/posts?sort=-title - SQL:
SELECT * FROM posts ORDER BY title DESC
- URL:
- By title, ascending:
- Paginate:
- 2 Per page:
- URL:
/api/v1/posts?page[size]=2 - SQL:
SELECT * FROM posts LIMIT 2
- URL:
- 2 Per page, second page:
- URL:
/api/v1/posts?page[size]=2&page[number]=2 - SQL:
SELECT * FROM posts LIMIT 2 OFFSET 2
- URL:
- 2 Per page:
- Sparse Fieldsets:
- Only render
title, notactive:- URL:
/api/v1/posts?fields[posts]=title - SQL:
SELECT * from posts(optimizing this query is on the roadmap)
- URL:
- Only render
- Filter:
- Simple:
- URL:
/api/v1/posts?filter[title]=my title - SQL:
SELECT * FROM posts WHERE title = "My title!"
- URL:
- Case Sensitive:
- URL:
/api/v1/posts?filter[title][eql]=My title - SQL:
SELECT * FROM posts WHERE lower(title) = "my title!"
- URL:
- Prefix:
- URL:
/api/v1/posts?filter[title][prefix]=my - SQL:
SELECT * FROM posts WHERE lower(title) LIKE 'my%'
- URL:
- Suffix:
- URL:
/api/v1/posts?filter[title][suffix]=title - SQL:
SELECT * FROM posts WHERE lower(title) LIKE '%title!'
- URL:
- Contains:
- URL:
/api/v1/posts?filter[title][match]=itl - SQL:
SELECT * FROM posts WHERE lower(title) LIKE '%itl%'
- URL:
- Greater Than:
- URL:
/api/v1/posts?filter[upvotes][gt]=20 - SQL:
SELECT * FROM posts WHERE upvotes > 20
- URL:
- Greater Than or Equal To:
- URL:
/api/v1/posts?filter[upvotes][gte]=20 - SQL:
SELECT * FROM posts WHERE upvotes >= 20
- URL:
- Less Than:
- URL:
/api/v1/posts?filter[upvotes][lt]=20 - SQL:
SELECT * FROM posts WHERE upvotes < 20
- URL:
- Less Than or Equal To:
- URL:
/api/v1/posts?filter[upvotes][lte]=20 - SQL:
SELECT * FROM posts WHERE upvotes <= 20
- URL:
- Any filter not whitelisted will raise
JsonapiCompliable::BadFiltererror. - All filter logic can be customized
- Customizations can be DRYed up and packaged into Adapters.
- Simple:
- Extra Fields:
- Sometimes you want to request additional fields not part of a normal response (perhaps they are computationally expensive).
- This can be done like so:
# app/resources/post_resource.rb
extra_attribute :description, :string do
  @object.active? ? 'Active Post' : 'Inactive Post'
end- URL:
/api/v1/posts?extra_fields[posts]=description - SQL:
SELECT * FROM posts -
You can conditionally eager load data or further customize this logic.
- Statistics:
- Useful for search grids - “Find me the first 10 active posts, and the total count of all posts”.
- URL:
/api/v1/posts?stats[total]=count - SQL:
SELECT count(*) from posts - Combine with filters and the count will adjust accordingly.
- There are a number of built-in stats, you can also add your own.
-
This is rendered in the
metasection of the response: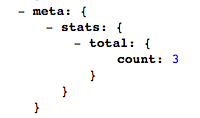
- View Documentation
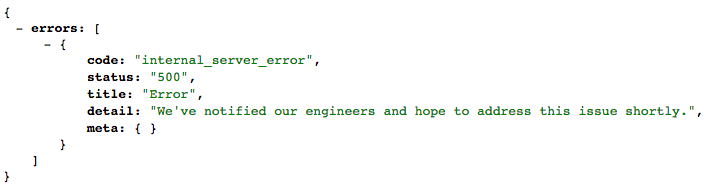
- Error Handling:
- Your app will always render a JSONAPI-compliable error response.
- Cause an error:
# app/controllers/posts_controller.rb
def index
  raise 'foo'
end-
The default payload you’d see in production:
-
Different errors can be customized with different response codes, JSON, and side-effects. See more in the Error Handling Guide.
Persisting
Resources can Create, Update, and Delete (and you can persist multiple Resources in a single request). The best way to observe this behavior is to take a look at the tests the generator created. One example:
# spec/api/v1/employees/create_spec.rb
subject(:make_request) do
  jsonapi_post "/api/v1/employees", payload
end

describe 'basic create' do
  let(:payload) do
    {
      data: {
        type: 'employees',
        attributes: {
          first_name: 'Jane'
        }
      }
    }
  end

  it 'works' do
    expect(EmployeeResource).to receive(:build).and_call_original
    expect {
      make_request
    }.to change { Employee.count }.by(1)
    expect(response.status).to eq(201)
  end
end
Read more about Persistence and Testing Persistence.
Adding Relationships
Let’s start by defining our Model:
$ bundle exec rails g model Comment post_id:integer body:text active:boolean
$ bundle exec rails db:migrate
# app/models/post.rb
has_many :comments
# app/models/comment.rb
belongs_to :post…and corresponding Resource object:
$ bundle exec rails g graphiti:resource Comment body:string active:boolean created_at:datetimeConfigure the relationship in PostResource:
# app/resources/post_resource.rb
has_many :comments
And allow filtering Comments based on the Post id:
# app/resources/comment_resource.rb
attribute :post_id, :integer, only: [:filterable]
This code:
- Allows eager-loading the relationship.
- URL:
/api/v1/posts?include=comments - SQL:
SELECT * FROM comments WHERE post_id = 123
- URL:
- Generates a Link for lazy-loading.
- Will use
CommentResourcefor querying logic (so we can Deep Query, e.g. “only return the latest 3 active comments”). - By default, this will generate the query
CommentResource.all(filter:
{ post_id: 123 })
, but relationships can be customized
You should now be able to hit /api/v1/comments with all the same
functionality as before. We just need to seed data.
Seeding Relationships
Start by clearing out your database:
$ bundle exec rails db:migrate:resetReplace your db/seeds.rb with this code to persist one Post and
three Comments:
comment1 = Comment.new(body: 'comment one', active: true)
comment2 = Comment.new(body: 'comment two', active: false)
comment3 = Comment.new(body: 'comment three', active: true)

Post.create! \
  title: 'My title!',
  active: true,
  comments: [comment1, comment2, comment3]
And run it:
$ bundle exec rails db:seedRelationship Usage
Now let’s fetch a Post and filtered Comments in a single request:
/api/v1/posts?include=comments
Any logic in CommentResource is available to us. Let’s sort the
comments by created_at descending:
/api/v1/posts?include=comments&sort=-comments.created_at.
Logic from CommentResource is accessible at the /api/v1/comments
endpoint, and reusable when eager-loading Comments at /api/v1/posts:
/api/v1/comments?filter[active]=true/api/v1/posts?include=comments&filter[comments.active]=true
This is why Resource objects exist: they provide an interface to reuse code across multiple Endpoints.
Also note: just as we can query a graph of Resources in a single request, we can persist a graph of Resources in a single request. See Sideposting.
Exploring with Vandal

Vandal is the Graphiti UI. It introspects your schema to make data exploration a breeze. The above screenshot shows Vandal fetching posts and comments from our blog.
To run Vandal, hit http://localhost:3000/api/v1/vandal. Click a
relationship once to include it in the response, click a second time to
edit deep query logic for the associated Resource.
If you’ve included an association, you can click a table row to view associated data.
The below screenshot is hitting /posts, and including only comments
with the text “two”:

Click here to play with Vandal hitting our Employee Directory Tutorial. Initial load might take longer as it runs on a free Heroku instance.
What's next
We have a full CRUD API with robust querying functionality, and the
ability to combine relationships for both reads and writes. But what
happens when you need to customize the sorting logic? What about replacing
ActiveRecord with an alternate persistence layer, or avoiding Rails
altogether?
These are important topics that Graphiti was built to address. To learn more about advanced usage and customization, we suggest following the Tutorial and reading through the Guides.
For help with specific use cases, join our Slack chat!
Testing
This Quickstart is meant to get you up-and-running quickly, so we didn’t write tests. But in Graphiti testing is the easiest, most pleasant way to develop your application.
Even if you’re not normally a TDDer, we highly recommend reading through our Integration Testing Guide.